Pivot tables rearrange data to represent it in a meaningful way. They provide different sorting options and provide sums, averages, or other statistics by grouping data together. It is an essential tool for data analysis and is a fundamental part of MS Excel. You might find yourself in scenarios where you need to create and manipulate pivot tables programmatically. To that end, this article will teach you how to work with pivot tables in Excel files using C++.
- C++ API for Working with Pivot Tables in Excel Files
- Create a Pivot Table in an Excel File using C++
- Sort Pivot Table in an Excel File using C++
- Hide Rows in a Pivot Table using C++
- Manipulate Pivot Table Data using C++
C++ API for Working with Pivot Tables in Excel Files
Aspose.Cells for C++ is a native C++ library that allows you to create, read and update Excel files without requiring Microsoft Excel to be installed. The API also supports working with pivot tables in Excel files. You can either install the API through NuGet or download it directly from the Downloads section.
PM> Install-Package Aspose.Cells.Cpp
Create a Pivot Table in an Excel File using C++
In the following example, we will create a new Excel file, insert sample data into it and create a pivot table. The file generated in this example will be used as the source file for other examples. The following are the steps to create a pivot table in an Excel file.
- Firstly, create an instance of the Workbook class to represent the new Excel file.
- Access the worksheet where you want to insert the pivot table using Workbook.GetWorksheets().Get(int32_t) method.
- Add sample data for the pivot table.
- Add pivot table using the Worksheet.GetPivotTables().Add(const U16String&, const U16String&, const U16String&) method.
- To access the pivot table, use the Worksheet.GetPivotTables().Get(int32_t) method.
- Manipulate the fields and set the style of the pivot table.
- Finally, save the Excel file using the Workbook.Save(const U16String &fileName) method.
The following sample code shows how to create a pivot table in an Excel file using C++.
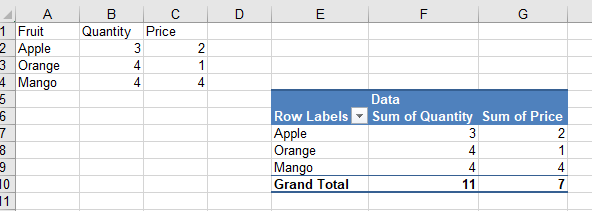
Image of the Pivot Table created by the sample code
Sort Pivot Table in an Excel File using C++
In the following example, we will sort the first column of the pivot table in descending order. The following are the steps to sort data in a pivot table.
- Firstly, load the sample Excel file using the Workbook class.
- Retrieve the worksheet containing the pivot table using Workbook.GetWorksheets().Get(int32_t) method.
- Access the pivot table using Worksheet.GetPivotTables().Get(int32_t) method.
- Get row field and sort the pivot table using the PivotField.SetIsAutoSort(bool value) and PivotField.SetIsAscendSort(bool value) methods.
- Refresh the contents of the pivot table and calculate the data using the PivotTable.RefreshData() and PivotTable.CalculateData() methods respectively.
- Finally, save the Excel file using the Workbook.Save(const U16String &fileName) method.
The following sample code demonstrates how to sort a pivot table in an Excel file using C++.
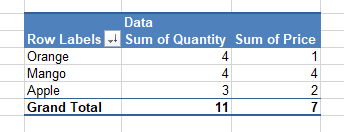
Image of the sorted Pivot Table generated by the sample code
Hide Rows in a Pivot Table using C++
With Aspose.Cells for C++ API, you can also hide the rows in a pivot table. In the following example, we will hide the row with the “Orange” row label. The following are the steps to hide rows in a pivot table.
- Firstly, load the sample Excel file using the Workbook class.
- Retrieve the worksheet containing the pivot table using Workbook.GetWorksheets().Get(int32_t) method.
- Access the pivot table using Worksheet.GetPivotTables().Get(int32_t) method.
- Get the pivot table data body range using PivotTable.GetDataBodyRange() method.
- Iterate through the rows of the pivot table and hide the rows meeting your criteria.
- Refresh the contents of the pivot table and calculate the data using the PivotTable.RefreshData() and PivotTable.CalculateData() methods respectively.
- Finally, save the Excel file using the Workbook.Save(const U16String &fileName) method.
The following sample code shows how to hide rows in a pivot table using C++.
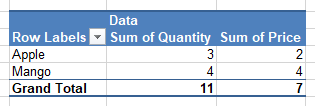
Image of the pivot table with a hidden row
Manipulate Pivot Table Data using C++
You can also manipulate the data of an existing pivot table using Aspose.Cells for C++ API. In the following example, we will replace the text “Apple” in cell “A2” with “Orange” and reflect the change in the pivot table. The following are the steps to manipulate pivot table data.
- Firstly, load the sample Excel file using the Workbook class.
- Retrieve the worksheet containing the pivot table data using the Workbook.GetWorksheets().Get(int32_t) method.
- Update the data of the pivot table according to your requirements.
- In order to access the pivot table, use Worksheet.GetPivotTables().Get(int32_t) method.
- Refresh the contents of the pivot table and calculate the data using the PivotTable.RefreshData() and PivotTable.CalculateData() methods respectively.
- Finally, save the Excel file using the Workbook.Save(const U16String &fileName) method.
The following sample code shows how to update the data of a pivot table using C++.

Pivot Table showing the updated data
Get a Free License
In order to try the API without evaluation limitations, you can request a free temporary license.
Conclusion
In this article, you have learned how to work with pivot tables in Excel files using C++. Specifically, you have learned how to create a pivot table and sort, hide and update the data in a pivot table using C++. Aspose.Cells for C++ is a vast API that provides a bunch of additional features for working with Excel files. You can explore the API in detail by visiting the official documentation. In case of any questions, please feel free to reach us on our free support forum.