Graphics programming in C# might seem easier or harder than you might think. In this article, you will learn how to create stunning vector graphics programmatically. Whether you’re creating graphics as a part of your current project or as the basis of your own game or app! You’ll learn to create beautiful visuals with ease. Let’s get started!
The following topics shall be covered in this article:
- C# Vector Graphics Programming API
- The Structure of a Vector Graphic
- Graphics Programming using C#
- Curves in Graphics Programming
- Polygons and Rectangles
- How to Draw Lines
- How to Draw Paths
- Draw a Fill Region
C# Vector Graphics Programming API - Free Download
To create stunning vector graphics in C#, we will be using the Aspose.Drawing for .NET API. It is a cross-platform 2D graphics library for drawing text, geometries, and images programmatically. It allows loading, saving, and manipulating the supported file formats.
Please either download the DLL of the API or install it using NuGet.
PM> Install-Package Aspose.Drawing
The Structure of a Vector Graphic
Vector graphics are made up of geometric shapes: lines, curves, and paths. These objects, with various properties such as length and color, can be manipulated by a C# program.
C# Graphics Programming
We can paint or draw various types of shapes including curves, lines, rectangles, filled regions, ellipses, and polygons. The API provides various methods to draw these shapes. We can create a variety of different vector graphics programmatically by following the steps given below:
- Create an object of the Bitmap class.
- Initialize an object of the Graphics class from the bitmap.
- Define a Pen or SolidBrush class object with desired parameters.
- Use the shape-specific method(s) of the Graphics class to draw the desired shape(s).
- In the end, save the image.
Now, let’s see how to perform these steps in C#.
Curves in Graphics Programming using C#
We can draw arcs, circles, ellipses, or closed curves by using the following methods:
- DrawArc() method to draw an arc.
- DrawEllipse() method to draw an ellipse.
- DrawClosedCurve() method to draw a closed curve.
- DrawCurve() method to draw a curve.
Please follow the steps given below to draw a curved shape:
- Firstly, create an instance of the Bitmap class.
- Next, create the Graphics class object using the FromImage() method from the newly created Bitmap object.
- Then, define a Pen class object with the specified color and size.
- After that, call the DrawClosedCurve() method to draw a closed curve.
- Optionally, repeat the above steps to add an arc and ellipse.
- Finally, save the output image using the Save() method.
The following code sample shows how to paint curved shapes in C#.

Curves in Graphics Programming using C#
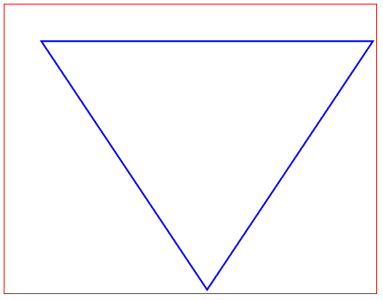
Polygons and Rectangles in Graphics Programming using C#
We can draw polygons and rectangles by following the steps mentioned earlier. However, we need to use the following methods in step # 4:
- DrawPolygon() method for drawing a polygon.
- DrawRectangle() method to draw a rectangle.
The following code sample shows how to draw polygons and rectangles in C#.
Load an Image in Bitmap using C#
Lines in Graphics Programming using C#
Similarly, we can draw lines by following the steps mentioned earlier. However, we need to use the DrawLine() method in step # 4 to draw a line.
The following code sample shows how to draw lines in C#.

Lines in Graphics Programming using C#
Paths in Graphics Programming using C#
In vector graphics, a path represents a series of smooth straight lines defined by a start and end point, along with other points. We can draw a path by following the steps given below:
- Firstly, create an instance of the Bitmap class.
- Next, initialize the Graphics class object from the newly created Bitmap object using the FromImage() method.
- Then, define a Pen class object with the specified color and size.
- Next, create an instance of the GraphicsPath class.
- Then, add lines using the AddLine() method.
- After that, call the DrawPath() method with Pen and GraphicsPath objects.
- Finally, save the output image using the Save() method.
The following code sample shows how to draw a path in C#.

Paths in Graphics Programming using C#
Fill Region in Graphics Programming using C#
We can draw a fill region by following the steps given below:
- Firstly, create an instance of the Bitmap class.
- Next, initialize the Graphics class object from the newly created Bitmap object using the FromImage() method.
- Then, create an instance of the GraphicsPath class.
- Meanwhile, add a polygon using the AddPolygon() method.
- Next, create an instance of the Region class.
- Then, add another GraphicsPath object and add a rectangle using the AddRectangle() method.
- Next, call the Exclude() method to exclude the inner path from the region.
- Then, define a SolidBrush class object with the specified color.
- After that, call the FillRegion() method with SolidBrush and GraphicsPath objects.
- Finally, save the output image using the Save() method.
The following code sample shows how to draw a filled region in C#.

Fill Region in Graphics Programming using C#
Get Free Temporary License
You can get a free temporary license to try Aspose.Drawing for .NET without evaluation limitations.
Conclusion
In this article, we have learned how to:
- create a new bitmap;
- draw rectangle, ellipse, etc. on a bitmap;
- draw lines and paths;
- save a Bitmap image as PNG in C#.
Besides graphics programming in C#, you can learn more about Aspose.Drawing for .NET using documentation and explore various features supported by the API. In case of any ambiguity, please feel free to contact us on our free support forum.