場合によっては、円、線、長方形などの形状を描画して、さまざまなオブジェクトを作成する必要がある場合があります。また、注釈のためにこれらの形状を画像に描画する必要がある場合もあります。この記事では、Java でプログラムによって形状を描画する方法を学習します。特に、線、楕円、円弧、および長方形を描き、それらの画像を生成する方法を学びます。
図形を描画する Java API - 無料ダウンロード
形状を描画して出力イメージを生成するには、Aspose.Imaging for Java を使用します。これは、画像を操作して描画を作成するための幅広い機能を提供する強力な画像編集 API です。 API を ダウンロード するか、次の Maven 構成を使用してインストールできます。
<repository>
    <id>AsposeJavaAPI</id>
    <name>Aspose Java API</name>
    <url>https://repository.aspose.com/repo/</url>
</repository>

<dependency>
    <groupId>com.aspose</groupId>
    <artifactId>aspose-imaging</artifactId>
    <version>22.9</version>
</dependency>
Java を使用して線を引く
Java で線を描画する手順は次のとおりです。
- まず、BmpOptions クラスのオブジェクトを作成し、setBitsPerPixel() メソッドを使用してピクセルあたりのビット数を設定します。
- 次に、setSource()メソッドを使用してStreamSourceを割り当てます。
- 新しい画像を作成し、BmpOptions オブジェクトと画像の高さと幅で初期化します。
- Graphics クラスのオブジェクトを作成し、Image オブジェクトで初期化します。
- Graphics.clear() メソッドを使用して、画像の表面を色でクリアします。
- Graphics.drawLine(Pen, int, int, int, int) メソッドを使用して線を描画します。
- Image.save() メソッドを使用して画像を生成し、保存します。
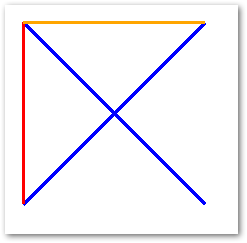
次のコード サンプルは、Java で線を描画する方法を示しています。
// BmpOptions の作成
com.aspose.imaging.imageoptions.BmpOptions bmpCreateOptions = new com.aspose.imaging.imageoptions.BmpOptions();
bmpCreateOptions.setBitsPerPixel(32);

// BmpOptions のインスタンスのソース プロパティを定義する
bmpCreateOptions.setSource(new StreamSource());

// Image のインスタンスを作成し、create メソッドを呼び出します。
// bmpCreateOptions オブジェクト
com.aspose.imaging.Image image = com.aspose.imaging.Image.create(bmpCreateOptions, 500, 500);

// Graphics クラスのインスタンスを作成して初期化する
com.aspose.imaging.Graphics graphic = new com.aspose.imaging.Graphics(image);

// 画像面を白色でクリアに
graphic.clear(com.aspose.imaging.Color.getWhite());

// 青色の Pen オブジェクトを指定して点線を描画し、
// 座標点
graphic.drawLine(new Pen(com.aspose.imaging.Color.getBlue(), 3), 18, 18, 200, 200);
graphic.drawLine(new Pen(com.aspose.imaging.Color.getBlue(), 3), 18, 200, 200, 18);

// Solidを持つPenオブジェクトを指定して連続線を描画
// 赤色と 2 点構造のブラシ
graphic.drawLine(new Pen(new com.aspose.imaging.brushes.SolidBrush(com.aspose.imaging.Color.getRed()), 3),
		new com.aspose.imaging.Point(18, 18), new com.aspose.imaging.Point(18, 200));

// Solidを持つPenオブジェクトを指定して連続線を描画
// 白い色と 2 点構造のブラシ
graphic.drawLine(new Pen(new com.aspose.imaging.brushes.SolidBrush(com.aspose.imaging.Color.getOrange()), 3),
		new com.aspose.imaging.Point(200, 18), new com.aspose.imaging.Point(18, 18));

// すべての変更を保存
image.save("draw_lines.bmp");
以下は、上記のコード サンプルの出力です。

Java を使用して楕円を描く
Java で楕円を描画する手順は次のとおりです。
- まず、BmpOptions クラスのオブジェクトを作成し、setBitsPerPixel() メソッドを使用してピクセルあたりのビット数を設定します。
- 次に、setSource()メソッドを使用してStreamSourceを割り当てます。
- 新しい画像を作成し、BmpOptions オブジェクトと画像の高さと幅で初期化します。
- Graphics クラスのオブジェクトを作成し、Image オブジェクトで初期化します。
- Graphics.clear() メソッドを使用して、画像の表面を色でクリアします。
- Graphics.drawEllipse(Pen, Rectangle) メソッドを使用して楕円を描画します。
- Image.save() メソッドを使用して画像を生成し、保存します。
次のコード サンプルは、Java でイメージに楕円を描画する方法を示しています。
// BmpOptions の作成
com.aspose.imaging.imageoptions.BmpOptions bmpCreateOptions = new com.aspose.imaging.imageoptions.BmpOptions();
bmpCreateOptions.setBitsPerPixel(32);

// BmpOptions のインスタンスのソース プロパティを定義する
bmpCreateOptions.setSource(new StreamSource());

// Image のインスタンスを作成し、create メソッドを呼び出します。
// bmpCreateOptions オブジェクト
com.aspose.imaging.Image image = com.aspose.imaging.Image.create(bmpCreateOptions, 400, 400);

// Graphics クラスのインスタンスを作成して初期化する
com.aspose.imaging.Graphics graphic = new com.aspose.imaging.Graphics(image);

// 画像面を白色でクリアに
graphic.clear(com.aspose.imaging.Color.getWhite());

// 赤色の Pen オブジェクトを指定して、点線の楕円形を描画します。
// color と周囲の Rectangle
graphic.drawEllipse(new Pen(com.aspose.imaging.Color.getRed(), 3),
		new com.aspose.imaging.Rectangle(60, 40, 70, 120));

// を持つ Pen オブジェクトを指定して、連続した楕円形を描画します。
// solid brush with blue color と周囲の Rectangle
graphic.drawEllipse(new Pen(new com.aspose.imaging.brushes.SolidBrush(com.aspose.imaging.Color.getBlue()), 3),
		new com.aspose.imaging.Rectangle(40, 60, 120, 70));

// すべての変更を保存
image.save("draw_ellipse.bmp");
以下は、上記のコード サンプルの出力です。

Java を使用して円弧を描く
Java で円弧を描く手順は次のとおりです。
- まず、BmpOptions クラスのオブジェクトを作成し、setBitsPerPixel() メソッドを使用してピクセルあたりのビット数を設定します。
- 次に、setSource()メソッドを使用してStreamSourceを割り当てます。
- 新しい画像を作成し、BmpOptions オブジェクトと画像の高さと幅で初期化します。
- Graphics クラスのオブジェクトを作成し、Image オブジェクトで初期化します。
- Graphics.clear() メソッドを使用して、画像の表面を色でクリアします。
- Graphics.drawArc(Pen, float x, float y, float width, float height, float startAngle, float swiftAngle) メソッドを使用して円弧を描画します。
- Image.save() メソッドを使用して画像を生成し、保存します。
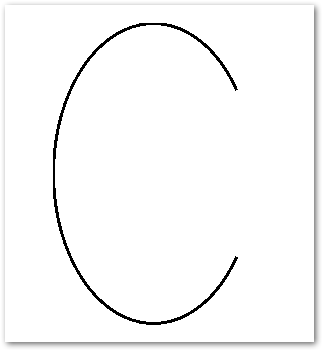
次のコード サンプルは、Java で画像に円弧を描く方法を示しています。
// BmpOptions の作成
com.aspose.imaging.imageoptions.BmpOptions bmpCreateOptions = new com.aspose.imaging.imageoptions.BmpOptions();
bmpCreateOptions.setBitsPerPixel(32);

// BmpOptions のインスタンスのソース プロパティを定義する
bmpCreateOptions.setSource(new StreamSource());

// Image のインスタンスを作成し、Create メソッドを呼び出します。
// BmpOptions オブジェクト
com.aspose.imaging.Image image = com.aspose.imaging.Image.create(bmpCreateOptions, 400, 400);

// Graphics クラスのインスタンスを作成して初期化する
com.aspose.imaging.Graphics graphic = new com.aspose.imaging.Graphics(image);

// 画像面を白色でクリアに
graphic.clear(com.aspose.imaging.Color.getWhite());

// 赤黒のペンオブジェクトを指定して点弧を描く
// 色と座標、高さ、幅、開始角度と終了角度
int width = 200;
int height = 300;
int startAngle = 45;
int sweepAngle = 270;

// 画面に弧を描く
graphic.drawArc(new Pen(com.aspose.imaging.Color.getBlack(), 3), 0, 0, width, height, startAngle, sweepAngle);

// すべての変更を保存
image.save("draw_arc.bmp");
以下は、上記のコード サンプルの出力です。

Javaを使用して長方形を描く
Java で四角形を描画する手順は次のとおりです。
- まず、BmpOptions クラスのオブジェクトを作成し、setBitsPerPixel() メソッドを使用してピクセルあたりのビット数を設定します。
- 次に、setSource()メソッドを使用してStreamSourceを割り当てます。
- 新しい画像を作成し、BmpOptions オブジェクトと画像の高さと幅で初期化します。
- Graphics クラスのオブジェクトを作成し、Image オブジェクトで初期化します。
- Graphics.clear() メソッドを使用して、画像の表面を色でクリアします。
- Graphics.drawRectangle(Pen, Rectangle) メソッドを使用して長方形を描画します。
- Image.save() メソッドを使用して画像を生成し、保存します。
次のコード サンプルは、Java で画像に四角形を描画する方法を示しています。
// BmpOptions の作成
com.aspose.imaging.imageoptions.BmpOptions bmpCreateOptions = new com.aspose.imaging.imageoptions.BmpOptions();
bmpCreateOptions.setBitsPerPixel(32);

// BmpOptions のインスタンスのソース プロパティを定義する
bmpCreateOptions.setSource(new StreamSource());

// Image のインスタンスを作成し、Create メソッドを呼び出します。
// bmpCreateOptionsオブジェクト
com.aspose.imaging.Image image = com.aspose.imaging.Image.create(bmpCreateOptions, 400, 400);

// Graphics クラスのインスタンスを作成して初期化する
com.aspose.imaging.Graphics graphic = new com.aspose.imaging.Graphics(image);

// 画像面を白色でクリアに
graphic.clear(com.aspose.imaging.Color.getWhite());

// 赤色の Pen オブジェクトを指定して、点線の長方形を描画します。
// 色と長方形の構造
graphic.drawRectangle(new Pen(com.aspose.imaging.Color.getRed(), 3),
		new com.aspose.imaging.Rectangle(60, 40, 70, 120));

// を持つ Pen オブジェクトを指定して、連続した長方形を描画します。
// solid brush with blue 色と長方形の構造
graphic.drawRectangle(new Pen(new com.aspose.imaging.brushes.SolidBrush(com.aspose.imaging.Color.getBlue()), 3),
		new com.aspose.imaging.Rectangle(40, 60, 120, 70));

// すべての変更を保存
image.save("draw_rectangle.bmp");
以下は、上記のコード サンプルの出力です。

Java Image Drawing API - 無料ライセンスを取得
無料の仮ライセンスを取得し、評価制限なしで図形を描くことができます。
結論
この記事では、Java で形状を描画する方法を学びました。プログラムで画像に線、楕円、円弧、および長方形を描画する方法について説明しました。提供されているコード サンプルを Java アプリケーションに簡単に統合できます。
続きを読む
ドキュメント を使用して、Java 画像処理 API について詳しく調べることができます。また、フォーラム を通じて質問を共有することもできます。