순서도는 워크플로 및 프로세스의 그래픽 표현을 디자인하기 위한 단계별 알고리즘을 이해하는 데 도움이 될 수 있습니다. 일부 시나리오에서는 문제 해결을 위해 순서도를 만들어야 할 수 있습니다. 이 기사에서는 Java에서 프로그래밍 방식으로 순서도 다이어그램을 만드는 방법을 다룹니다.
Flowchart Diagram을 만들기 위한 Java API 설치
Aspose.Diagram for Java API를 사용하여 순서도를 작성할 수 있습니다. VSD, VSDX 및 기타 지원되는 형식의 Visio 파일 생성 또는 편집을 지원합니다. New Releases 섹션에서 JAR 파일을 다운로드하거나 다음 Maven 사양을 사용하여 API를 쉽게 설치할 수 있습니다.
저장소:
 <repositories>
    <repository>
        <id>AsposeJavaAPI</id>
        <name>Aspose Java API</name>
        <url>http://repository.aspose.com/repo/</url>
    </repository>
</repositories>
의존:
 <dependencies>
    <dependency>
        <groupId>com.aspose</groupId>
        <artifactId>aspose-diagram</artifactId>
        <version>22.1</version>
        <classifier>jdk16</classifier>
    </dependency>
</dependencies>
Java에서 프로그래밍 방식으로 순서도 만들기
시퀀스의 단계를 설명하는 순서도를 만들 수 있습니다. 순서도를 만들려면 다음 단계를 따라야 합니다.
- 먼저 다이어그램 생성을 위한 스키마를 생성합니다.
- 둘째, 모양을 추가하기 위한 마스터로 VSS 파일을 로드합니다. 다이어그램 클래스를 사용합니다.
- 스키마에서 셰이프 및 커넥터 추가
- 순서도 다이어그램의 레이아웃을 설정합니다.
- 마지막으로 저장 방법을 사용하여 VSDX 형식의 순서도와 함께 출력 파일을 작성합니다.
아래 코드 샘플은 Java에서 프로그래밍 방식으로 순서도 다이어그램을 만드는 방법을 자세히 설명합니다.
// 새 다이어그램 만들기
int pageNumber = 0;
String rectangleMaster = "Process", decisionMaster = "Decision", connectorMaster = "Dynamic connector";

Diagram diagram = new Diagram("XANFLOWCHARTNEW.vss");

double width = 1, height = 1, pinX = 4, pinY = 10;
long process1 = diagram.addShape(pinX, pinY, width, height, rectangleMaster, 0);
Shape processShape1 = diagram.getPages().getPage(pageNumber).getShapes().getShape(process1);

processShape1.getText().getValue().add(new Txt("PROCESS"));
processShape1.setName("PROCESS");
processShape1.getXForm().getLocPinX().getUfe().setF("Width*0.5");
processShape1.getXForm().getLocPinY().getUfe().setF("Height*0.5");

pinY = pinY - 2;

long decision1 = diagram.addShape(pinX, pinY, width, height, decisionMaster, 0);
Shape decisionShape1 = diagram.getPages().getPage(pageNumber).getShapes().getShape(decision1);

decisionShape1.getText().getValue().add(new Txt("DECISION"));
decisionShape1.setName("DECISION");
decisionShape1.getXForm().getLocPinX().getUfe().setF("Width*0.5");
decisionShape1.getXForm().getLocPinY().getUfe().setF("Height*0.5");

pinY = pinY - 2;
long process2 = diagram.addShape(pinX, pinY, width, height, rectangleMaster, 0);
Shape processShape2 = diagram.getPages().getPage(pageNumber).getShapes().getShape(process2);

processShape2.getText().getValue().add(new Txt("PROCESS"));
processShape2.setName("PROCESS");
processShape2.getXForm().getLocPinX().getUfe().setF("Width*0.5");
processShape2.getXForm().getLocPinY().getUfe().setF("Height*0.5");

pinY = pinY - 2;
long process3 = diagram.addShape(pinX, pinY, width, height, rectangleMaster, 0);
Shape processShape3 = diagram.getPages().getPage(pageNumber).getShapes().getShape(process3);

processShape3.getText().getValue().add(new Txt("PROCESS"));
processShape3.setName("PROCESS");
processShape3.getXForm().getLocPinX().getUfe().setF("Width*0.5");
processShape3.getXForm().getLocPinY().getUfe().setF("Height*0.5");

pinY = pinY - 2;
long process4 = diagram.addShape(pinX, pinY, width, height, rectangleMaster, 0);
Shape processShape4 = diagram.getPages().getPage(pageNumber).getShapes().getShape(process4);

processShape4.getText().getValue().add(new Txt("PROCESS"));
processShape4.setName("PROCESS");
processShape4.getXForm().getLocPinX().getUfe().setF("Width*0.5");
processShape4.getXForm().getLocPinY().getUfe().setF("Height*0.5");

long connecterId = diagram.addShape(new Shape(), connectorMaster, 0);
diagram.getPages().getPage(pageNumber).connectShapesViaConnector(process1, ConnectionPointPlace.BOTTOM,
        decision1, ConnectionPointPlace.TOP, connecterId);

long connecterId1 = diagram.addShape(new Shape(), connectorMaster, 0);
diagram.getPages().getPage(pageNumber).connectShapesViaConnector(decision1, ConnectionPointPlace.BOTTOM,
        process2, ConnectionPointPlace.TOP, connecterId1);

long connecterId2 = diagram.addShape(new Shape(), connectorMaster, 0);
diagram.getPages().getPage(pageNumber).connectShapesViaConnector(process2, ConnectionPointPlace.BOTTOM,
        process3, ConnectionPointPlace.TOP, connecterId2);

long connecterId3 = diagram.addShape(new Shape(), connectorMaster, 0);
diagram.getPages().getPage(pageNumber).connectShapesViaConnector(process3, ConnectionPointPlace.BOTTOM,
        process4, ConnectionPointPlace.TOP, connecterId3);

long connecterId4 = diagram.addShape(new Shape(), connectorMaster, 0);
diagram.getPages().getPage(pageNumber).connectShapesViaConnector(decision1, ConnectionPointPlace.RIGHT,
        process4, ConnectionPointPlace.TOP, connecterId4);

// 자동 레이아웃 옵션 설정
LayoutOptions layoutOptions = new LayoutOptions();

// 방법
layoutOptions.setLayoutStyle(LayoutStyle.FLOW_CHART);
layoutOptions.setDirection(LayoutDirection.BOTTOM_TO_TOP);
diagram.layout(layoutOptions);

DiagramSaveOptions options = new DiagramSaveOptions(SaveFileFormat.VSDX);
diagram.save("sample.vsdx", options);
샘플 출력 순서도 미리보기
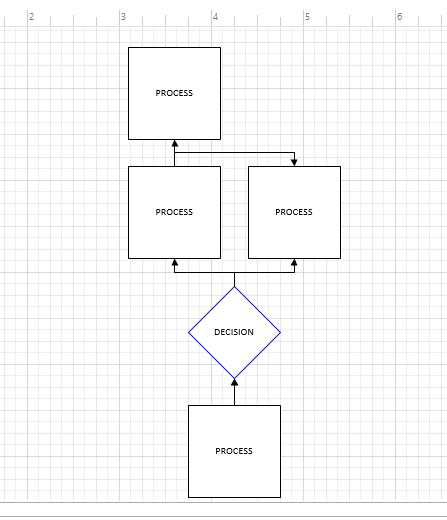
또한 이 기능을 확인하기 위해 입력 및 출력 파일을 다운로드할 수 있습니다.
무료 API 라이선스 받기
임시 무료 라이선스를 요청하면 API의 모든 기능을 제한 없이 평가할 수 있습니다.
결론
결론적으로 Java를 사용하여 프로그래밍 방식으로 순서도를 생성하거나 만드는 방법을 배웠습니다. 요구 사항에 따라 순서도의 방향이나 모양을 사용자 지정하고 변경할 수 있습니다. 따라서 Java 애플리케이션 내에서 API 호출을 사용하여 이 기능을 쉽게 포함할 수 있습니다. 또한 API 문서를 방문하여 API의 다른 여러 기능을 확인할 수 있습니다. 포럼에 연락하여 질문을 할 수 있습니다.