
Mã vạch chứa thông tin về sản phẩm hoặc công ty, được trình bày trực quan dưới dạng máy có thể đọc được. Mã vạch được sử dụng rộng rãi để theo dõi các lô hàng và quản lý hàng tồn kho. Chúng tôi có thể dễ dàng tạo nhiều loại mã vạch khác nhau trong các ứng dụng WPF. Trong bài viết này, chúng ta sẽ tìm hiểu cách tạo và hiển thị hình ảnh mã vạch trong ứng dụng WPF. Sau khi làm theo các bước đã đề cập, chúng tôi sẽ có Trình tạo mã vạch WPF của riêng mình trong C#. Vì vậy, chúng ta hãy bắt đầu.
Bài báo sẽ bao gồm các chủ đề sau:
- Tính năng của Trình tạo mã vạch WPF
- API trình tạo mã vạch C#
- Các bước tạo Trình tạo mã vạch WPF
- Tạo mã vạch với các tùy chọn bổ sung
- Trình tạo mã vạch WPF trình diễn
- Tải xuống mã nguồn
Tính năng của Máy tạo mã vạch WPF
Trình tạo mã vạch WPF của chúng tôi sẽ có các tính năng sau.
- Tạo các loại ký hiệu mã vạch sau:
- Mã128
- Mã11
- Mã39
- QR
- Ma trận dữ liệu
- EAN13
- EAN8
- ITF14
- PDF417
- Lưu hình ảnh mã vạch đã tạo ở các định dạng sau:
- Xem trước hình ảnh mã vạch đã tạo.
API trình tạo mã vạch C#
Chúng tôi sẽ sử dụng API Aspose.BarCode for .NET để tạo hình ảnh mã vạch và xem trước chúng trong ứng dụng WPF. Đây là một API giàu tính năng cho phép bạn tạo, quét và đọc nhiều loại loại mã vạch. Hơn nữa, nó cho phép thao tác sự xuất hiện của các mã vạch được tạo ra như màu nền, màu vạch, góc xoay, kích thước x, chất lượng hình ảnh, độ phân giải, chú thích, kích thước và nhiều hơn nữa.
Các bước tạo Trình tạo mã vạch WPF
Chúng tôi có thể tạo và hiển thị hình ảnh mã vạch trong ứng dụng WPF bằng cách thực hiện theo các bước dưới đây:
- Đầu tiên, tạo một dự án mới và chọn mẫu dự án Ứng dụng WPF.
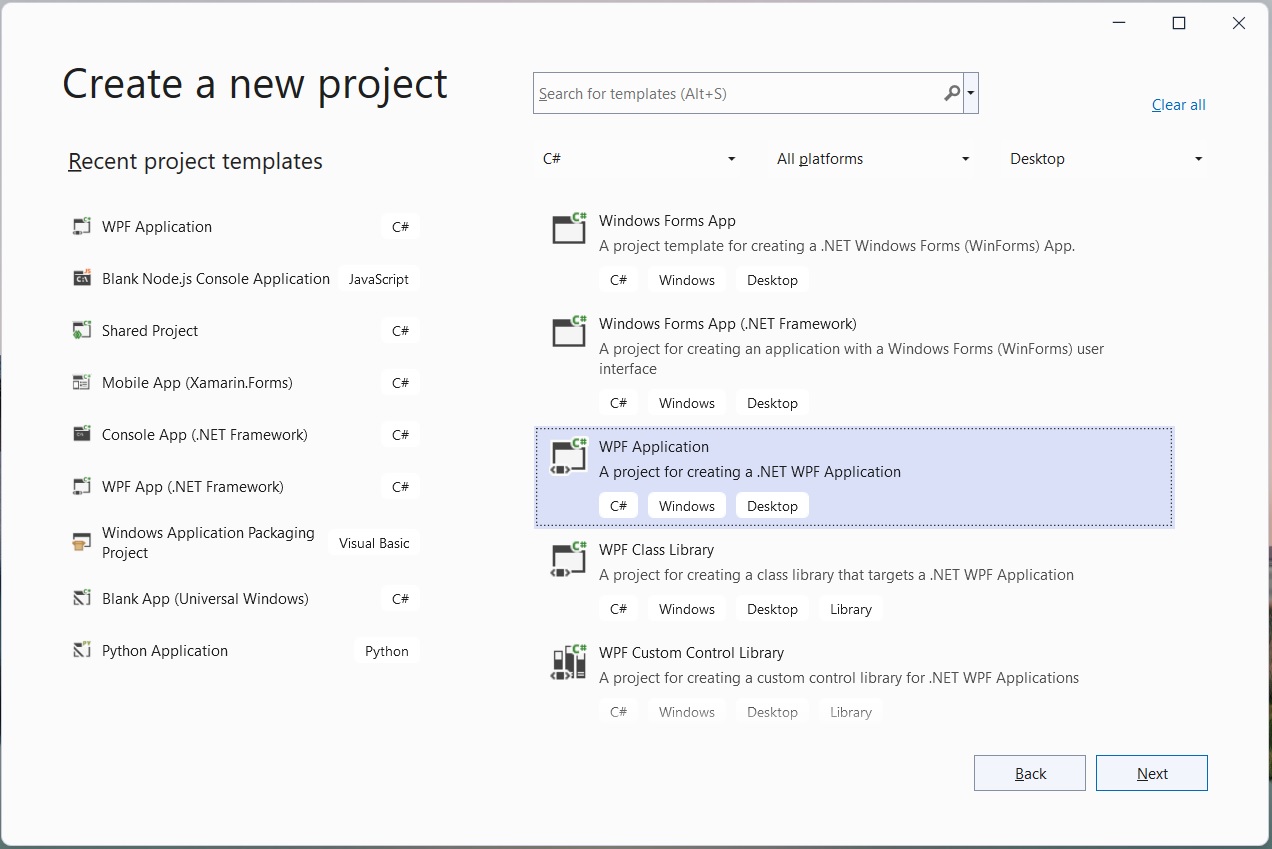
Tiếp theo, nhập tên của dự án, ví dụ “BarcodeGen”.
Sau đó, chọn .NET framework rồi chọn tạo.
Tiếp theo, mở NuGet Package Manager và cài đặt gói Aspose.BarCode for .NET.
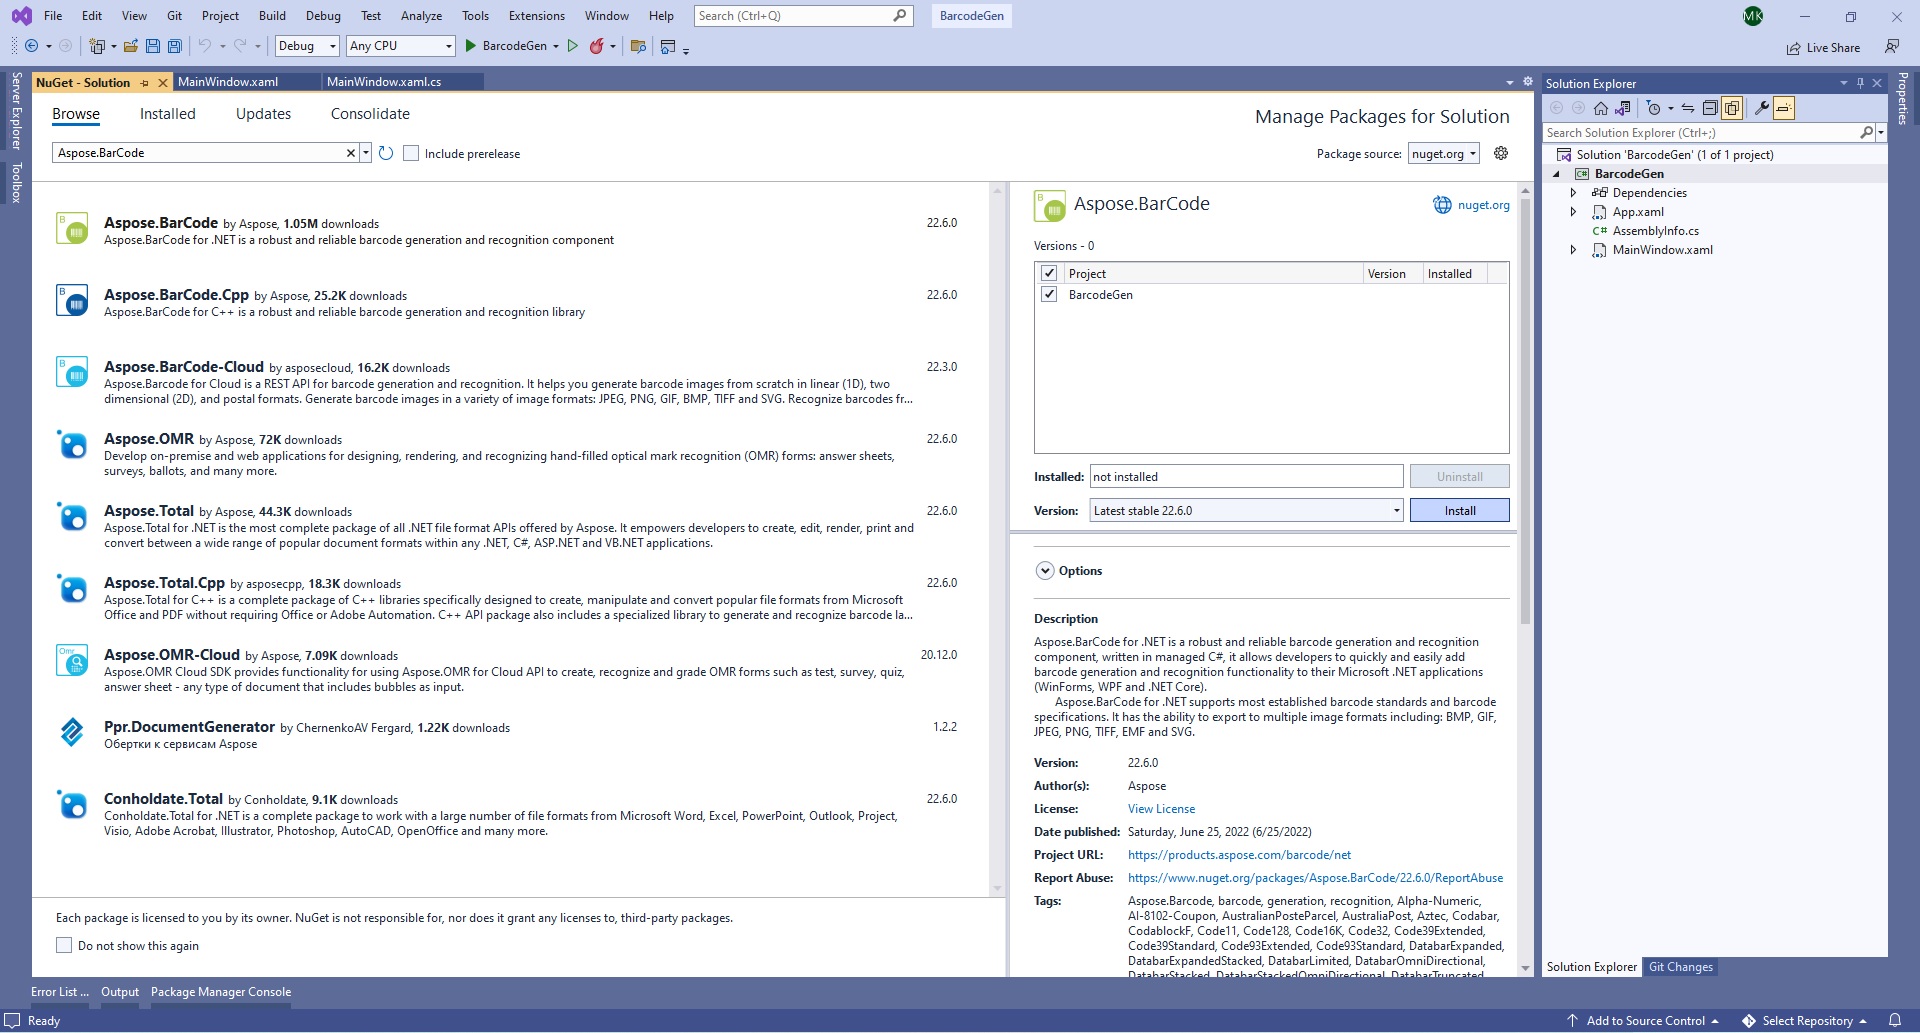
Cài đặt Aspose.BarCode cho .NET
- Sau đó, thêm một lớp Barcode.cs mới để xác định mã vạch.
public class Barcode
{
    public string? Text { get; set; }

    public BaseEncodeType? BarcodeType { get; set; }

    public BarCodeImageFormat ImageType { get; set; }
}
- Tiếp theo, mở MainWindow.xaml và thêm các điều khiển cần thiết như hình dưới đây:
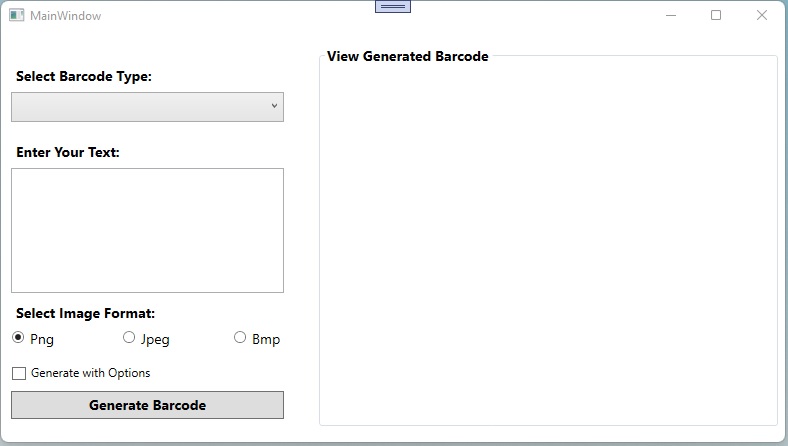
Thêm các điều khiển bắt buộc
Bạn cũng có thể thay thế nội dung của MainWindow.xaml bằng tập lệnh sau.
<Window x:Class="BarcodeGen.MainWindow"
        xmlns="http://schemas.microsoft.com/winfx/2006/xaml/presentation"
        xmlns:x="http://schemas.microsoft.com/winfx/2006/xaml"
        xmlns:d="http://schemas.microsoft.com/expression/blend/2008"
        xmlns:mc="http://schemas.openxmlformats.org/markup-compatibility/2006"
        xmlns:local="clr-namespace:BarcodeGen"
        mc:Ignorable="d"
        Title="MainWindow" Height="450" Width="800">

    <Grid Width="800" Height="384">
        <Grid.RowDefinitions>
            <RowDefinition Height="191*"/>
            <RowDefinition/>
        </Grid.RowDefinitions>
        <Label Content="Select Barcode Type:" HorizontalAlignment="Left" Margin="10,16,0,0" VerticalAlignment="Top" FontSize="14" FontWeight="Bold"/>
        <ComboBox x:Name="comboBarcodeType" HorizontalAlignment="Left" Margin="10,47,0,305" Width="273" Text="Select Barcode Type" IsReadOnly="True" SelectedIndex="-1" FontSize="14" Height="30">
            <ComboBoxItem Content="Code128"></ComboBoxItem>
            <ComboBoxItem Content="Code11"></ComboBoxItem>
            <ComboBoxItem Content="Code32"></ComboBoxItem>
            <ComboBoxItem Content="QR"></ComboBoxItem>
            <ComboBoxItem Content="DataMatrix"></ComboBoxItem>
            <ComboBoxItem Content="EAN13"></ComboBoxItem>
            <ComboBoxItem Content="EAN8"></ComboBoxItem>
            <ComboBoxItem Content="ITF14"></ComboBoxItem>
            <ComboBoxItem Content="PDF417"></ComboBoxItem>
        </ComboBox>

        <Button Name="btnGenerate" Click="btnGenerate_Click" Content="Generate Barcode" HorizontalAlignment="Left" Margin="10,346,0,0" VerticalAlignment="Top" Height="28" Width="273" FontSize="14" FontWeight="Bold"/>
        <Label Content="Enter Your Text:" HorizontalAlignment="Left" Margin="10,92,0,0" VerticalAlignment="Top" FontSize="14" FontWeight="Bold"/>
        <TextBox Name="tbCodeText" TextWrapping="Wrap" Margin="10,123,517,134" Width="273" Height="125"/>
        <Label Content="Select Image Format:" HorizontalAlignment="Left" Margin="10,253,0,0" VerticalAlignment="Top" FontSize="14" FontWeight="Bold"/>
        <RadioButton Name="rbPng" Content="Png" GroupName="rbImageType" Margin="10,285,739,77" Width="51" Height="20" FontSize="14" IsChecked="True"/>
        <RadioButton Name="rbJpg" Content="Jpeg" GroupName="rbImageType" Margin="121,285,628,77" Width="51" Height="20" FontSize="14"/>
        <RadioButton Name="rbBmp" Content="Bmp" GroupName="rbImageType" Margin="232,285,517,77" Width="51" Height="20" FontSize="14"/>
        <CheckBox Name="cbGenerateWithOptions" Height="20" Margin="10,321,517,41" Content="Generate with Options" />
        <GroupBox Header="View Generated Barcode" Margin="317,0,22,0" FontSize="14" FontWeight="Bold">
            <Image Name="imgDynamic" Margin="6,-6,7,6" Stretch="None"  />
        </GroupBox>
    </Grid>
</Window>
- Sau đó, mở lớp MainWindow.xaml.cs và thêm sự kiện btnGenerateClick để xử lý hành động nhấp cho nút Tạo mã vạch.
private void btnGenerate_Click(object sender, RoutedEventArgs e)
{
    // Đặt mặc định là Png
    var imageType = "Png";

    // Nhận định dạng hình ảnh do người dùng chọn
    if(rbPng.IsChecked == true)
    {
        imageType = rbPng.Content.ToString();
    }
    else if(rbBmp.IsChecked == true)
    {
        imageType = rbBmp.Content.ToString();
    }
    else if(rbJpg.IsChecked == true)
    {
        imageType = rbJpg.Content.ToString();
    }

    // Nhận định dạng hình ảnh từ enum
    var imageFormat = (BarCodeImageFormat)Enum.Parse(typeof(BarCodeImageFormat), imageType.ToString());

    // Đặt mặc định là Code128
    var encodeType = EncodeTypes.Code128;

    // Nhận loại mã vạch do người dùng chọn
    if (!string.IsNullOrEmpty(comboBarcodeType.Text))
    {
        switch (comboBarcodeType.Text)
        {
            case "Code128":
                encodeType = EncodeTypes.Code128;
                break;

            case "ITF14":
                encodeType = EncodeTypes.ITF14;
                break;

            case "EAN13":
                encodeType = EncodeTypes.EAN13;
                break;

            case "Datamatrix":
                encodeType = EncodeTypes.DataMatrix;
                break;

            case "Code32":
                encodeType = EncodeTypes.Code32;
                break;

            case "Code11":
                encodeType = EncodeTypes.Code11;
                break;

            case "PDF417":
                encodeType = EncodeTypes.Pdf417;
                break;

            case "EAN8":
                encodeType = EncodeTypes.EAN8;
                break;

            case "QR":
                encodeType = EncodeTypes.QR;
                break;
        }
    }

    // Initalize đối tượng mã vạch
    Barcode barcode = new Barcode();
    barcode.Text = tbCodeText.Text;
    barcode.BarcodeType = encodeType;
    barcode.ImageType = imageFormat;

    try
    {
        string imagePath = "";

        if (cbGenerateWithOptions.IsChecked == true)
        {
            // Tạo mã vạch với các tùy chọn bổ sung và lấy đường dẫn hình ảnh
            imagePath = GenerateBarcodeWithOptions(barcode);
        }
        else
        {
            // Tạo mã vạch và lấy đường dẫn hình ảnh
            imagePath = GenerateBarcode(barcode);
        }

        // Hiển thị hình ảnh
        Uri fileUri = new Uri(Path.GetFullPath(imagePath));
        imgDynamic.Source = new BitmapImage(fileUri);
    }
    catch (Exception ex)
    {
        MessageBox.Show(ex.Message);
    }
}
- Sau đó, thêm chức năng tạo mã vạch.
private string GenerateBarcode(Barcode barcode)
{
    // Đường dẫn hình ảnh
    string imagePath = comboBarcodeType.Text + "." + barcode.ImageType;

    // Khởi tạo trình tạo mã vạch
    BarcodeGenerator generator = new BarcodeGenerator(barcode.BarcodeType, barcode.Text);

    // Lưu hình ảnh
    generator.Save(imagePath, barcode.ImageType);

    return imagePath;
}
- Cuối cùng, chạy ứng dụng.
Tạo mã vạch với các tùy chọn bổ sung
Chúng tôi cũng có thể tạo mã vạch với các tùy chọn bổ sung dành riêng cho các loại mã vạch. Trong trình tạo mã vạch WPF, chúng tôi đã thêm hộp kiểm để tạo mã vạch với các tùy chọn. Nó sẽ gọi hàm sau chỉ định các tùy chọn bổ sung cho các loại mã vạch khác nhau.
private string GenerateBarcodeWithOptions(Barcode barcode)
{
    // Đường dẫn hình ảnh
    string imagePath = comboBarcodeType.Text + "." + barcode.ImageType;

    // Khởi tạo trình tạo mã vạch
    BarcodeGenerator generator = new BarcodeGenerator(barcode.BarcodeType, barcode.Text);

    if(barcode.BarcodeType == EncodeTypes.QR)
    {
        generator.Parameters.Barcode.XDimension.Pixels = 4;
        //đặt phiên bản tự động
        generator.Parameters.Barcode.QR.QrVersion = QRVersion.Auto;
        //Đặt loại mã hóa QR Tự động
        generator.Parameters.Barcode.QR.QrEncodeType = QREncodeType.Auto;
    }
    else if(barcode.BarcodeType == EncodeTypes.Pdf417)
    {
        generator.Parameters.Barcode.XDimension.Pixels = 2;
        generator.Parameters.Barcode.Pdf417.Columns = 3;
    }
    else if(barcode.BarcodeType == EncodeTypes.DataMatrix)
    {
        //đặt DataMatrix ECC thành 140
        generator.Parameters.Barcode.DataMatrix.DataMatrixEcc = DataMatrixEccType.Ecc200;
    }
    else if(barcode.BarcodeType == EncodeTypes.Code32)
    {
        generator.Parameters.Barcode.XDimension.Millimeters = 1f;
    }
    else
    {
        generator.Parameters.Barcode.XDimension.Pixels = 2;
        //đặt BarHeight 40
        generator.Parameters.Barcode.BarHeight.Pixels = 40;
    }

    // Lưu hình ảnh
    generator.Save(imagePath, barcode.ImageType);

    return imagePath;
}
Bạn có thể đọc thêm về Đặc điểm thế hệ cho các loại mã vạch trong tài liệu.
Demo Trình tạo mã vạch WPF
Sau đây là phần trình diễn ứng dụng WPF Barcode Generator mà chúng tôi vừa tạo.
Demo Trình tạo mã vạch WPF
Tải xuống mã nguồn
Bạn có thể tải xuống mã nguồn hoàn chỉnh của ứng dụng WPF Barcode Generator từ GitHub.
Nhận giấy phép miễn phí
Bạn có thể nhận giấy phép tạm thời miễn phí để dùng thử thư viện mà không có giới hạn đánh giá.
Sự kết luận
Trong bài viết này, chúng ta đã học cách tạo nhiều loại mã vạch khác nhau trong ứng dụng WPF. Chúng tôi cũng đã biết cách xem trước hình ảnh mã vạch được tạo theo chương trình. Bên cạnh đó, bạn có thể tìm hiểu thêm về Aspose.BarCode cho .NET API bằng cách sử dụng tài liệu. Trong trường hợp có bất kỳ sự mơ hồ nào, vui lòng liên hệ với chúng tôi trên diễn đàn của chúng tôi.