MS PowerPoint cung cấp các hiệu ứng 3D để làm cho các bài thuyết trình hấp dẫn hơn. Bạn có thể sử dụng văn bản, hình dạng và hình ảnh 3D để nâng cao tính tương tác của nội dung. Trong bài viết này, bạn sẽ học cách áp dụng các hiệu ứng 3D trong PowerPoint PPT theo lập trình bằng Python. Chúng tôi sẽ trình bày cách tạo hiệu ứng 3D cho văn bản, hình dạng và hình ảnh trong bản trình bày.
- Thư viện Python để tạo hiệu ứng 3D trong PowerPoint
- Tạo văn bản 3D trong PowerPoint bằng Python
- Tạo hình dạng 3D trong PowerPoint bằng Python
- Đặt Gradient cho Hình dạng 3D
- Áp dụng hiệu ứng 3D cho hình ảnh trong PowerPoint
Thư viện Python để áp dụng hiệu ứng 3D trong PowerPoint
Aspose.Slides dành cho Python qua .NET là một thư viện Python giàu tính năng được thiết kế để tạo và thao tác các bản trình bày PowerPoint. Chúng tôi sẽ sử dụng thư viện này để áp dụng hiệu ứng 3D trong các bản trình bày PowerPoint PPT / PPTX. Sử dụng lệnh sau để cài đặt thư viện từ PyPI.
> pip install aspose.slides
Tạo văn bản 3D trong PowerPoint bằng Python
Sau đây là các bước để tạo một đoạn văn bản 3D trong PowerPoint PPT bằng Python.
- Đầu tiên, tạo một PPT mới hoặc tải một PPT hiện có bằng cách sử dụng lớp Trình bày.
- Sau đó, thêm một hình chữ nhật mới bằng phương thức addautoshape().
- Đặt các thuộc tính của hình dạng như kiểu tô, văn bản, v.v.
- Nhận tham chiếu của phần văn bản bên trong hình dạng thành một đối tượng.
- Áp dụng định dạng cho phần văn bản.
- Tham khảo hình dạng bên trong khung văn bản.
- Áp dụng hiệu ứng 3D bằng cách sử dụng các thuộc tính trong textframe.textframeformat.threedformat.
- Cuối cùng, lưu bản trình bày bằng phương thức Presentation.save (String, SaveFormat).
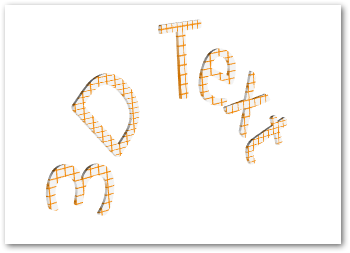
Mẫu mã sau đây cho thấy cách tạo văn bản 3D trong PowerPoint bằng Python.
with slides.Presentation() as pres:
    # thêm hình dạng
    shape = pres.slides[0].shapes.add_auto_shape(slides.ShapeType.RECTANGLE, 200, 150, 250, 250)
    shape.fill_format.fill_type = slides.FillType.NO_FILL
    shape.fill_format.fill_type = slides.FillType.NO_FILL
    shape.line_format.fill_format.fill_type = slides.FillType.NO_FILL
    shape.text_frame.text = "3D text"

    # truy cập phần văn bản và áp dụng định dạng
    portion = shape.text_frame.paragraphs[0].portions[0]
    portion.portion_format.fill_format.fill_type = slides.FillType.PATTERN
    portion.portion_format.fill_format.pattern_format.fore_color.color = drawing.Color.dark_orange
    portion.portion_format.fill_format.pattern_format.back_color.color = drawing.Color.white
    portion.portion_format.fill_format.pattern_format.pattern_style = slides.PatternStyle.LARGE_GRID

    shape.text_frame.paragraphs[0].paragraph_format.default_portion_format.font_height = 128

    # truy cập khung văn bản
    textFrame = shape.text_frame

    # thiết lập hiệu ứng chuyển đổi WordArt "Arch Up"
    textFrame.text_frame_format.transform = slides.TextShapeType.ARCH_UP

    # áp dụng hiệu ứng 3D
    textFrame.text_frame_format.three_dformat.extrusion_height = 3.5
    textFrame.text_frame_format.three_dformat.depth = 3
    textFrame.text_frame_format.three_dformat.material = slides.MaterialPresetType.PLASTIC
    textFrame.text_frame_format.three_dformat.light_rig.direction = slides.LightingDirection.TOP
    textFrame.text_frame_format.three_dformat.light_rig.light_type = slides.light_rigPresetType.BALANCED
    textFrame.text_frame_format.three_dformat.light_rig.set_rotation(0, 0, 40)

    textFrame.text_frame_format.three_dformat.camera.camera_type = slides.CameraPresetType.PERSPECTIVE_CONTRASTING_RIGHT_FACING

    # lưu dưới dạng hình ảnh (tùy chọn)
    pres.slides[0].get_thumbnail(2, 2).save("3D-text.png")

    # lưu bản trình bày
    pres.save("3D-text.pptx", slides.export.SaveFormat.PPTX)
Ảnh chụp màn hình sau đây cho thấy đầu ra của mẫu mã ở trên.
Tạo hình dạng 3D trong PowerPoint bằng Python
Tương tự như văn bản, bạn có thể áp dụng hiệu ứng 3D cho các hình dạng trong bản trình bày PowerPoint. Sau đây là các bước để tạo hình dạng 3D trong PowerPoint bằng Python.
- Đầu tiên, tạo một PPT mới bằng cách sử dụng lớp Trình bày.
- Sau đó, thêm một hình chữ nhật mới bằng phương thức addautoshape().
- Đặt văn bản của hình dạng bằng thuộc tính shape.textframe.text.
- Áp dụng hiệu ứng 3D cho hình dạng bằng cách sử dụng các thuộc tính trong shape.threedformat.
- Cuối cùng, lưu bản trình bày bằng phương thức Presentation.save (String, SaveFormat).
Mẫu mã sau đây cho thấy cách áp dụng hiệu ứng 3D cho hình dạng trong PowerPoint bằng Python.
with slides.Presentation() as pres:
    # thêm hình dạng
    shape = pres.slides[0].shapes.add_auto_shape(slides.ShapeType.RECTANGLE, 200, 150, 200, 200)
    shape.text_frame.text = "3D"
    shape.text_frame.paragraphs[0].paragraph_format.default_portion_format.font_height = 64

    # áp dụng hiệu ứng 3D
    shape.three_dformat.camera.camera_type = slides.CameraPresetType.ORTHOGRAPHIC_FRONT
    shape.three_dformat.camera.set_rotation(20, 30, 40)
    shape.three_dformat.light_rig.light_type = slides.LightRigPresetType.FLAT
    shape.three_dformat.light_rig.direction = slides.LightingDirection.TOP
    shape.three_dformat.material = slides.MaterialPresetType.FLAT
    shape.three_dformat.extrusion_height = 100
    shape.three_dformat.extrusion_color.color = drawing.Color.blue

    # lưu dưới dạng hình ảnh (tùy chọn)
    pres.slides[0].get_thumbnail(2, 2).save("3D-shape.png")

    # lưu bản trình bày
    pres.save("3D-shape.pptx", slides.export.SaveFormat.PPTX)
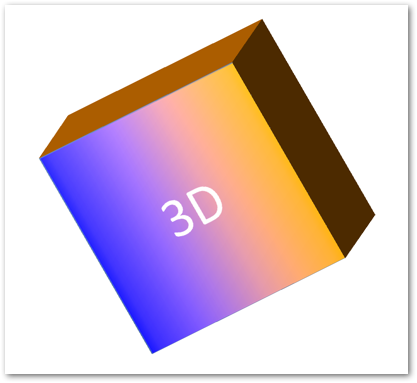
Sau đây là hình dạng 3D mà chúng ta nhận được sau khi thực hiện đoạn mã này.

Tạo Gradient cho Hình dạng 3D
Bạn cũng có thể áp dụng hiệu ứng gradient cho các hình dạng theo các bước bên dưới.
- Đầu tiên, tạo một PPT mới bằng cách sử dụng lớp Trình bày.
- Sau đó, thêm một hình chữ nhật mới bằng phương thức addautoshape().
- Đặt văn bản của hình dạng bằng thuộc tính shape.textframe.text.
- Đặt shape.fillformat.filltype thành FillType.GRADIENT và đặt màu gradient.
- Áp dụng hiệu ứng 3D cho hình dạng bằng cách sử dụng các thuộc tính trong shape.threedformat.
- Cuối cùng, lưu bản trình bày bằng phương thức Presentation.save (String, SaveFormat).
Mẫu mã sau đây cho thấy cách áp dụng hiệu ứng gradient cho hình dạng trong PowerPoint.
with slides.Presentation() as pres:
    # thêm hình dạng
    shape = pres.slides[0].shapes.add_auto_shape(slides.ShapeType.RECTANGLE, 200, 150, 250, 250)
    shape.text_frame.text = "3D"
    shape.text_frame.paragraphs[0].paragraph_format.default_portion_format.font_height = 64

    # đặt loại tô dưới dạng gradient
    shape.fill_format.fill_type = slides.FillType.GRADIENT
    shape.fill_format.gradient_format.gradient_stops.add(0, drawing.Color.blue)
    shape.fill_format.gradient_format.gradient_stops.add(100, drawing.Color.orange)

    # áp dụng hiệu ứng 3D
    shape.three_dformat.camera.camera_type = slides.CameraPresetType.ORTHOGRAPHIC_FRONT
    shape.three_dformat.camera.set_rotation(10, 20, 30)
    shape.three_dformat.light_rig.light_type = slides.LightRigPresetType.FLAT
    shape.three_dformat.light_rig.direction = slides.LightingDirection.TOP
    shape.three_dformat.extrusion_height = 150
    shape.three_dformat.extrusion_color.color = drawing.Color.dark_orange

    # lưu dưới dạng hình ảnh (tùy chọn)
    pres.slides[0].get_thumbnail(2, 2).save("3D-shape-gradient.png")

    # lưu bản trình bày
    pres.save("3D-shape-gradient.pptx", slides.export.SaveFormat.PPTX)
Sau đây là hình dạng 3D sau khi áp dụng hiệu ứng gradient.
Áp dụng hiệu ứng 3D cho hình ảnh trong PowerPoint bằng Python
Bạn cũng có thể áp dụng hiệu ứng 3D cho hình ảnh trong bản trình bày PowerPoint. Sau đây là các bước để thực hiện thao tác này trong Python.
- Tạo một PPT mới bằng cách sử dụng lớp Trình bày.
- Sau đó, thêm một hình chữ nhật mới bằng phương thức addautoshape().
- Đặt shape.fillformat.filltype thành FillType.PICTURE và thêm hình ảnh.
- Áp dụng hiệu ứng 3D cho hình dạng bằng cách sử dụng các thuộc tính trong shape.threedformat.
- Lưu bản trình bày bằng phương pháp Presentation.save (String, SaveFormat).
Sau đây là các bước để áp dụng hiệu ứng 3D cho hình ảnh trong PPT bằng Python.
with slides.Presentation() as pres:
    # thêm hình dạng
    shape = pres.slides[0].shapes.add_auto_shape(slides.ShapeType.RECTANGLE, 200, 150, 250, 250)

    # đặt loại điền như hình ảnh
    shape.fill_format.fill_type = slides.FillType.PICTURE

    # tải hình ảnh từ tệp
    with open("tiger.bmp", "rb") as fs :
        data = fs.read()

        # thiết lập hình ảnh
        shape.fill_format.picture_fill_format.picture.image = pres.images.add_image(data)
        shape.fill_format.picture_fill_format.picture_fill_mode = slides.PictureFillMode.STRETCH

        # áp dụng hiệu ứng 3D cho hình ảnh
        shape.three_dformat.camera.camera_type = slides.CameraPresetType.ORTHOGRAPHIC_FRONT
        shape.three_dformat.camera.set_rotation(10, 20, 30)
        shape.three_dformat.light_rig.light_type = slides.LightRigPresetType.FLAT
        shape.three_dformat.light_rig.direction = slides.LightingDirection.TOP
        shape.three_dformat.extrusion_height = 150
        shape.three_dformat.extrusion_color.color = drawing.Color.dark_orange

    # lưu dưới dạng hình ảnh (tùy chọn)
    pres.slides[0].get_thumbnail(2, 2).save("image_3d.png")

    # lưu bản trình bày
    pres.save("3D-image.pptx", slides.export.SaveFormat.PPTX)
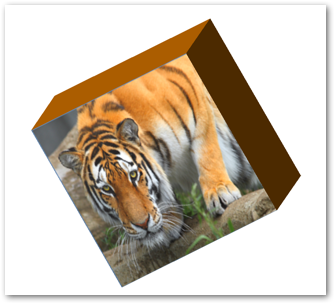
Sau đây là hình ảnh kết quả mà chúng tôi nhận được sau khi áp dụng hiệu ứng 3D.
Nhận giấy phép miễn phí
Bạn có thể nhận giấy phép tạm thời miễn phí để sử dụng Aspose.Slides for Python qua .NET mà không có giới hạn đánh giá.
Sự kết luận
Trong bài viết này, bạn đã học cách áp dụng hiệu ứng 3D trong bản trình bày PowerPoint bằng Python. Chúng tôi đã trình bày cách tạo văn bản hoặc hình dạng 3D và áp dụng hiệu ứng 3D cho hình ảnh trong bản trình bày PPT hoặc PPTX. Trong trường hợp bạn muốn khám phá thêm về Aspose.Slides for Python qua .NET, bạn có thể truy cập tài liệu. Ngoài ra, bạn có thể đăng các truy vấn của mình lên diễn đàn của chúng tôi.