之前,我寫了一篇關於如何使用 C# 實現 Excel 自動化功能和從頭創建 Excel XLS/XLSX 文件的帖子。今天,我將向您展示如何使用 C++ 創建 Excel 工作簿、向 Excel 工作表插入數據、計算公式以及在工作表中創建圖表和表格。所有電子表格自動化功能都將由 C++ Excel API - Aspose.Cells for C++ 提供支持。
Aspose.Cells for C++ 是一個原生的 C++ 庫,讓您無需 Microsoft Excel 即可創建、讀取、解析和轉換電子表格文檔。它提供了一套完整的 Excel 自動化功能,可用於生成和操作 XLS/XLSX 電子表格。在本文中,我們將介紹從頭開始創建 Excel XLS/XLSX 文件的以下功能。
- 使用 C++ 創建 Excel 文件 (XLS/XLSX)
- 使用 C++ 將數據添加到 Excel 工作表
- 使用 C++ 計算工作簿公式
- 使用 C++ 在 Excel 工作表中創建表
- 使用 C++ 在 Excel XLS/XLSX 中創建圖表
C++ Excel 電子表格 API - 安裝
您可以從 下載 部分下載完整的 Aspose.Cells for C++ 庫文件包。該軟件包還包含一個隨時可以運行的示例控制台應用程序。
使用 C++ 創建 Excel 文件 (XLS/XLSX)
讓我們首先從頭開始創建一個簡單的 Excel XLSX 工作簿。工作簿由一個或多個工作表組成,每個工作表包含行和列形式的數據。因此,為了創建Excel電子表格,您需要先創建一個工作簿,然後在其中添加工作表。以下是使用 Aspose.Cells for C++ 創建 Excel 文件的步驟。
- 創建 IWorkbook 類的對象。
- 將工作簿的第一個工作表(默認創建)從 IWorksheetCollection 中獲取到 IWorksheet 對像中。
- 使用 IWorksheet->GetICells() 方法將工作表的單元格訪問到 ICells 對像中。
- 通過指定行和列索引,使用 ICells->GetObjectByIndex() 方法將工作表的所需單元格訪問到 ICell 對像中。
- 使用 ICell->PutValue() 方法向單元格添加值。
- 使用 IWorkbook->Save() 方法將工作簿保存為 .xlsx 文件。
以下代碼示例顯示如何使用 C++ 創建 Excel XLSX 文件。
/*create a new workbook*/
intrusive_ptr<IWorkbook> wb = Factory::CreateIWorkbook();

/*get the first worksheet*/
intrusive_ptr<IWorksheetCollection> wsc = wb->GetIWorksheets();
intrusive_ptr<IWorksheet> ws = wsc->GetObjectByIndex(0);

/*get cell(0,0)*/
intrusive_ptr<ICells> cells = ws->GetICells();
intrusive_ptr<ICell> cell = cells->GetObjectByIndex(0, 0);

/*write "Hello World" to cell(0,0) of the first sheet*/
intrusive_ptr<String> str = new String("Hello World!");
cell->PutValue(str);

/*save this workbook to resultFile folder*/
wb->Save(resultPath->StringAppend(new String("workbook.xlsx")));
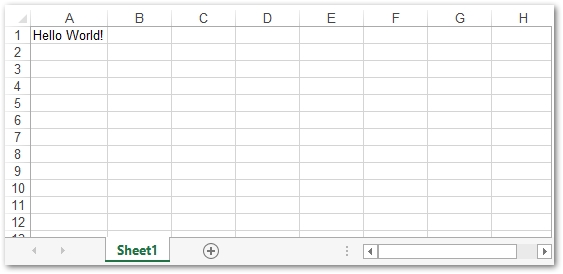
Excel 工作簿
以下是我們剛剛創建的 Excel 工作簿的屏幕截圖。
使用 C++ 將數據添加到 Excel 工作表
在前面的示例中,我們了解瞭如何創建一個簡單的 Excel 文件並使用行和列索引將值插入到特定單元格。然而,大多數情況下,Excel 工作表中的單元格是使用列字母和行號(例如 A1、A2、B1 等)來標識的。因此,讓我們看一下如何使用單元格名稱將數據插入工作表的示例。該過程僅在向單元格添加值方面有所不同,創建 Excel 工作簿和工作表的所有其他步驟都是相同的。
以下代碼示例顯示如何創建 Excel XLSX 工作簿並使用 C++ 將數據插入其中。
//輸出excel文件路徑
StringPtr outputData = resultPath->StringAppend(new String("outputData.xlsx"));

//讀取輸入的excel文件
intrusive_ptr<IWorkbook> workbook = Factory::CreateIWorkbook();

//訪問 Excel 文件中的第二個工作表
intrusive_ptr<IWorksheet> worksheet = workbook->GetIWorksheets()->GetObjectByIndex(0);

//向單元格添加字符串值
worksheet->GetICells()->GetObjectByIndex(new String("A1"))->PutValue("Hello World");

//向單元格添加雙精度值
worksheet->GetICells()->GetObjectByIndex(new String("A2"))->PutValue(20.5);

//向單元格添加整數值
worksheet->GetICells()->GetObjectByIndex(new String("A3"))->PutValue(15);

//向單元格添加布爾值
worksheet->GetICells()->GetObjectByIndex(new String("A4"))->PutValue(true);

//設置日期的顯示格式
intrusive_ptr<ICell> cell = worksheet->GetICells()->GetObjectByIndex(new String("A5"));
intrusive_ptr<IStyle> style = cell->GetIStyle();
style->SetNumber(15);
cell->SetIStyle(style);

//保存工作簿
workbook->Save(outputData);
使用 C++ 計算工作簿公式
在 Excel 工作簿中設置公式是對數據執行計算的一項了不起的功能。它使有效且高效地對數據執行複雜計算變得非常容易。以下是在 Excel 工作表中設置和計算公式的步驟。
- 創建 IWorkbook 類的對象。
- 從 IWorksheetCollection 中獲取工作表到 IWorksheet 對像中。
- 使用 ICell 類訪問要應用公式的單元格。
- 使用 ICell->SetFormula() 方法為單元格設置公式。
- 使用 IWorkbook->CalculateFormula() 方法計算公式。
- 使用 IWorkbook->Save() 方法保存工作簿。
以下代碼示例顯示如何使用 C++ 在 Excel XLSX 工作簿中添加和計算公式。
//創建新工作簿
intrusive_ptr<IWorkbook> wb = Factory::CreateIWorkbook();

//獲取默認創建的第一個工作表
intrusive_ptr<IWorksheet> ws = wb->GetIWorksheets()->GetObjectByIndex(0);

//向“A1”單元格添加值
intrusive_ptr<ICell> cell = ws->GetICells()->GetObjectByIndex(new String("A1"));
cell->PutValue(5);

//向“A2”單元格添加值
cell = ws->GetICells()->GetObjectByIndex(new String("A2"));
cell->PutValue(15);

//向“A3”單元格添加值
cell = ws->GetICells()->GetObjectByIndex(new String("A3"));
cell->PutValue(25);

//將 SUM 公式添加到“A4”單元格
cell = ws->GetICells()->GetObjectByIndex(new String("A4"));
cell->SetFormula(new String("=SUM(A1:A3)"));

//計算公式的結果
wb->CalculateFormula();

//獲取單元格“A4”的計算值並將其打印在控制台上
cell = ws->GetICells()->GetObjectByIndex(new String("A4"));
StringPtr sCalcuInfo = new String(L"Calculated Value of Cell A4: ");
Console::WriteLine(sCalcuInfo->StringAppend(cell->GetStringValue()));
使用 C++ 在 Excel 工作表中創建表
Excel 工作表中的表格用於組織位於單元格區域中的一組數據。表格還可以幫助您在工作表中維護不同類型的列表。以下是在 Excel 工作表中創建表格的步驟。
- 使用 IWorkbook 類創建一個新的 Excel 工作簿。
- 將默認工作表訪問到 IWorksheet 對像或添加一個新工作表。
- 以我們在上一個示例中所做的相同方式將值/數據插入單元格。
- 使用 IWorksheet->GetIListObjects()->Add() 方法將單元格範圍添加到工作表的列表集合中。
- 將列表獲取到 IListObject 對像中。
- 使用 IListObject->SetTableStyleType() 方法將樣式應用於表格。
- 將工作簿另存為 .xlsx 文件。
以下代碼示例顯示瞭如何使用 C++ 在 Excel XLSX 文件中創建表格。
// 實例化工作簿對象
intrusive_ptr<IWorkbook>  workbook = Factory::CreateIWorkbook();

// 獲取默認(第一個)工作表的引用
intrusive_ptr<IWorksheet> worksheet = workbook->GetIWorksheets()->GetObjectByIndex(0);

// 獲取工作表的單元格集合
intrusive_ptr<ICells> cells = worksheet->GetICells();

// 為單元格設置值
cells->GetObjectByIndex(new String("A1"))->PutValue("Employee");
cells->GetObjectByIndex(new String("B1"))->PutValue("Quarter");
cells->GetObjectByIndex(new String("C1"))->PutValue("Product");
cells->GetObjectByIndex(new String("D1"))->PutValue("Continent");
cells->GetObjectByIndex(new String("E1"))->PutValue("Country");
cells->GetObjectByIndex(new String("F1"))->PutValue("Sale");

cells->GetObjectByIndex(new String("A2"))->PutValue("David");
cells->GetObjectByIndex(new String("A3"))->PutValue("David");
cells->GetObjectByIndex(new String("A4"))->PutValue("David");
cells->GetObjectByIndex(new String("A5"))->PutValue("David");
cells->GetObjectByIndex(new String("A6"))->PutValue("James");

cells->GetObjectByIndex(new String("B2"))->PutValue(1);
cells->GetObjectByIndex(new String("B3"))->PutValue(2);
cells->GetObjectByIndex(new String("B4"))->PutValue(3);
cells->GetObjectByIndex(new String("B5"))->PutValue(4);
cells->GetObjectByIndex(new String("B6"))->PutValue(1);

cells->GetObjectByIndex(new String("C2"))->PutValue("Maxilaku");
cells->GetObjectByIndex(new String("C3"))->PutValue("Maxilaku");
cells->GetObjectByIndex(new String("C4"))->PutValue("Chai");
cells->GetObjectByIndex(new String("C5"))->PutValue("Maxilaku");
cells->GetObjectByIndex(new String("C6"))->PutValue("Chang");

cells->GetObjectByIndex(new String("D2"))->PutValue("Asia");
cells->GetObjectByIndex(new String("D3"))->PutValue("Asia");
cells->GetObjectByIndex(new String("D4"))->PutValue("Asia");
cells->GetObjectByIndex(new String("D5"))->PutValue("Asia");
cells->GetObjectByIndex(new String("D6"))->PutValue("Europe");

cells->GetObjectByIndex(new String("E2"))->PutValue("China");
cells->GetObjectByIndex(new String("E3"))->PutValue("India");
cells->GetObjectByIndex(new String("E4"))->PutValue("Korea");
cells->GetObjectByIndex(new String("E5"))->PutValue("India");
cells->GetObjectByIndex(new String("E6"))->PutValue("France");

cells->GetObjectByIndex(new String("F2"))->PutValue(2000);
cells->GetObjectByIndex(new String("F3"))->PutValue(500);
cells->GetObjectByIndex(new String("F4"))->PutValue(1200);
cells->GetObjectByIndex(new String("F5"))->PutValue(1500);
cells->GetObjectByIndex(new String("F6"))->PutValue(500);


// 向工作表添加新的列表對象
worksheet->GetIListObjects()->Add(new String("A1"), new String("F6"), true);
intrusive_ptr<IListObject> listObject = worksheet->GetIListObjects()->GetObjectByIndex(0);

// 為表格添加默認樣式
listObject->SetTableStyleType(TableStyleType_TableStyleMedium10);

// 顯示總計
listObject->SetShowTotals(true);

// 保存 Excel 文件
workbook->Save(resultPath->StringAppend(new String("Excel_Table.xlsx")));
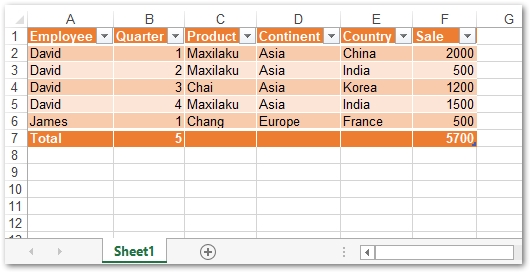
帶錶格的 Excel 工作簿
使用 C++ 在 Excel 電子表格中創建圖表
Excel 電子表格中的圖表用於使用不同類型的圖形對象來可視化數據。它們使我們能夠快速洞察和理解數據,尤其是當數據量很大時。 Aspose.Cells for C++ 支持多種圖表,包括旭日圖、樹狀圖、直方圖、金字塔圖、氣泡圖、折線圖和更多。以下是使用 Aspose.Cells for C++ 在 Excel 工作簿中創建圖表的步驟。
- 創建一個新的 Excel 工作簿。
- 將所需的工作表訪問到 IWorksheet 對像中。
- 使用 IWorksheet->GetICharts()->Add() 方法通過傳遞圖表類型將新圖表添加到工作表。
- 將新添加的圖表訪問到 IChart 對像中。
- 使用 IChart->GetNISeries()->Add() 方法設置圖表的數據源。
- 將工作簿另存為 .xlsx 文件。
以下代碼示例展示瞭如何使用 C++ 在 Excel XLSX 文件中創建圖表。
// 輸出excel文件路徑
StringPtr outputChartTypePyramid = resultPath->StringAppend(new String("Exce_Pyramid_Chart.xlsx"));

// 創建新工作簿
intrusive_ptr<IWorkbook> workbook = Factory::CreateIWorkbook();

// 獲取默認創建的第一個工作表
intrusive_ptr<IWorksheet> worksheet = workbook->GetIWorksheets()->GetObjectByIndex(0);

// 將示例值添加到單元格
worksheet->GetICells()->GetObjectByIndex(new String("A1"))->PutValue(50);
worksheet->GetICells()->GetObjectByIndex(new String("A2"))->PutValue(100);
worksheet->GetICells()->GetObjectByIndex(new String("A3"))->PutValue(150);
worksheet->GetICells()->GetObjectByIndex(new String("B1"))->PutValue(4);
worksheet->GetICells()->GetObjectByIndex(new String("B2"))->PutValue(20);
worksheet->GetICells()->GetObjectByIndex(new String("B3"))->PutValue(50);

// 向工作表添加圖表
int chartIndex = worksheet->GetICharts()->Add(Aspose::Cells::Charts::ChartType::ChartType_Pyramid, 5, 0, 20, 8);

// 訪問新添加圖表的實例
intrusive_ptr<Aspose::Cells::Charts::IChart> chart = worksheet->GetICharts()->GetObjectByIndex(chartIndex);

// 將 SeriesCollection(圖表數據源)添加到從“A1”單元格到“B3”的圖表
chart->GetNISeries()->Add(new String("A1:B3"), true);

// 保存 Excel 文件
workbook->Save(outputChartTypePyramid);
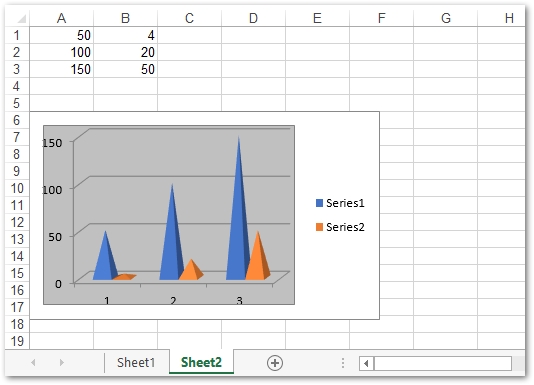
帶圖表的 Excel 工作簿
結論
在本文中,我們介紹瞭如何使用 C++ 從頭開始創建 MS Excel 電子表格。本文還包含有關如何在 Excel 工作表中創建表格、圖表和計算公式的分步指南和代碼示例。您可以從 Aspose.Cells for C++ 的 文檔 了解更多與 Excel 自動化相關的其他高級功能。