在某些情況下,您可能需要通過繪製圓形、直線、矩形等形狀來創建不同的對象。此外,您可能必須在圖像上繪製這些形狀以進行註釋。在本文中,您將學習如何在 Java 中以編程方式繪製形狀。特別是,您將學習如何繪製直線、橢圓、圓弧和矩形並生成它們的圖像。
用於繪製形狀的 Java API - 免費下載
要繪製形狀並生成輸出圖像,我們將使用 Aspose.Imaging for Java。它是一個強大的圖像編輯 API,提供了廣泛的功能來處理圖像和創建繪圖。您可以 下載 API 或使用以下 Maven 配置安裝它。
<repository>
    <id>AsposeJavaAPI</id>
    <name>Aspose Java API</name>
    <url>https://repository.aspose.com/repo/</url>
</repository>

<dependency>
    <groupId>com.aspose</groupId>
    <artifactId>aspose-imaging</artifactId>
    <version>22.9</version>
</dependency>
使用 Java 畫一條線
以下是在 Java 中畫線的步驟。
- 首先,創建一個 BmpOptions 類的對象並使用 setBitsPerPixel() 方法設置每個像素的位數。
- 然後,使用 setSource() 方法分配 StreamSource。
- 創建一個新圖像並使用 BmpOptions 對象和圖像的高度和寬度對其進行初始化。
- 創建一個 Graphics 類的對象並用 Image 對像初始化它。
- 使用 Graphics.clear() 方法用一些顏色清除圖像表面。
- 使用 Graphics.drawLine(Pen, int, int, int, int) 方法畫線。
- 使用 Image.save() 方法生成並保存圖像。
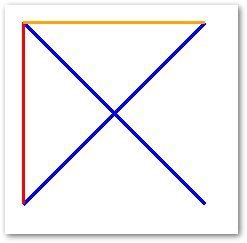
以下代碼示例顯示瞭如何在 Java 中繪製一條線。
// 創建 BmpOptions
com.aspose.imaging.imageoptions.BmpOptions bmpCreateOptions = new com.aspose.imaging.imageoptions.BmpOptions();
bmpCreateOptions.setBitsPerPixel(32);

// 定義 BmpOptions 實例的源屬性
bmpCreateOptions.setSource(new StreamSource());

// 創建 Image 的實例並通過傳遞
// bmpCreateOptions 對象
com.aspose.imaging.Image image = com.aspose.imaging.Image.create(bmpCreateOptions, 500, 500);

// 創建並初始化 Graphics 類的實例
com.aspose.imaging.Graphics graphic = new com.aspose.imaging.Graphics(image);

// 用白色清除圖像表面
graphic.clear(com.aspose.imaging.Color.getWhite());

// 通過指定具有藍色的 Pen 對象繪製一條虛線,並且
// 坐標點
graphic.drawLine(new Pen(com.aspose.imaging.Color.getBlue(), 3), 18, 18, 200, 200);
graphic.drawLine(new Pen(com.aspose.imaging.Color.getBlue(), 3), 18, 200, 200, 18);

// 通過指定具有 Solid 的 Pen 對象繪製一條連續的線
// 帶紅色和兩點結構的畫筆
graphic.drawLine(new Pen(new com.aspose.imaging.brushes.SolidBrush(com.aspose.imaging.Color.getRed()), 3),
		new com.aspose.imaging.Point(18, 18), new com.aspose.imaging.Point(18, 200));

// 通過指定具有 Solid 的 Pen 對象繪製一條連續的線
// 具有白色和兩點結構的畫筆
graphic.drawLine(new Pen(new com.aspose.imaging.brushes.SolidBrush(com.aspose.imaging.Color.getOrange()), 3),
		new com.aspose.imaging.Point(200, 18), new com.aspose.imaging.Point(18, 18));

// 保存所有更改
image.save("draw_lines.bmp");
以下是上述代碼示例的輸出。
使用 Java 繪製橢圓
下面是用Java畫橢圓的步驟。
- 首先,創建一個 BmpOptions 類的對象並使用 setBitsPerPixel() 方法設置每個像素的位數。
- 然後,使用 setSource() 方法分配 StreamSource。
- 創建一個新圖像並使用 BmpOptions 對象和圖像的高度和寬度對其進行初始化。
- 創建一個 Graphics 類的對象並用 Image 對像初始化它。
- 使用 Graphics.clear() 方法用一些顏色清除圖像表面。
- 使用 Graphics.drawEllipse(Pen, Rectangle) 方法繪製一個橢圓。
- 使用 Image.save() 方法生成並保存圖像。
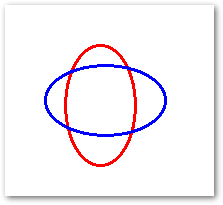
以下代碼示例顯示瞭如何使用 Java 在圖像上繪製橢圓。
// 創建 BmpOptions
com.aspose.imaging.imageoptions.BmpOptions bmpCreateOptions = new com.aspose.imaging.imageoptions.BmpOptions();
bmpCreateOptions.setBitsPerPixel(32);

// 定義 BmpOptions 實例的源屬性
bmpCreateOptions.setSource(new StreamSource());

// 創建 Image 的實例並通過傳遞
// bmpCreateOptions 對象
com.aspose.imaging.Image image = com.aspose.imaging.Image.create(bmpCreateOptions, 400, 400);

// 創建並初始化 Graphics 類的實例
com.aspose.imaging.Graphics graphic = new com.aspose.imaging.Graphics(image);

// 用白色清除圖像表面
graphic.clear(com.aspose.imaging.Color.getWhite());

// 通過指定具有紅色的 Pen 對象繪製虛線橢圓形狀
// 顏色和周圍的矩形
graphic.drawEllipse(new Pen(com.aspose.imaging.Color.getRed(), 3),
		new com.aspose.imaging.Rectangle(60, 40, 70, 120));

// 通過指定 Pen 對象繪製一個連續的橢圓形狀
// solid brush with blue 顏色和周圍的矩形
graphic.drawEllipse(new Pen(new com.aspose.imaging.brushes.SolidBrush(com.aspose.imaging.Color.getBlue()), 3),
		new com.aspose.imaging.Rectangle(40, 60, 120, 70));

// 保存所有更改
image.save("draw_ellipse.bmp");
以下是上述代碼示例的輸出。
使用 Java 繪製圓弧
下面是用Java畫圓弧的步驟。
- 首先,創建一個 BmpOptions 類的對象並使用 setBitsPerPixel() 方法設置每個像素的位數。
- 然後,使用 setSource() 方法分配 StreamSource。
- 創建一個新圖像並使用 BmpOptions 對象和圖像的高度和寬度對其進行初始化。
- 創建一個 Graphics 類的對象並用 Image 對像初始化它。
- 使用 Graphics.clear() 方法用一些顏色清除圖像表面。
- 使用 Graphics.drawArc(Pen, float x, float y, float width, float height, float startAngle, float sweepAngle) 方法繪製圓弧。
- 使用 Image.save() 方法生成並保存圖像。
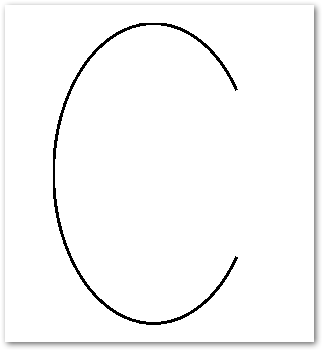
以下代碼示例顯示瞭如何使用 Java 在圖像上繪製圓弧。
// 創建 BmpOptions
com.aspose.imaging.imageoptions.BmpOptions bmpCreateOptions = new com.aspose.imaging.imageoptions.BmpOptions();
bmpCreateOptions.setBitsPerPixel(32);

// 定義 BmpOptions 實例的源屬性
bmpCreateOptions.setSource(new StreamSource());

// 創建 Image 的實例並通過傳遞
// BmpOptions 對象
com.aspose.imaging.Image image = com.aspose.imaging.Image.create(bmpCreateOptions, 400, 400);

// 創建並初始化 Graphics 類的實例
com.aspose.imaging.Graphics graphic = new com.aspose.imaging.Graphics(image);

// 用白色清除圖像表面
graphic.clear(com.aspose.imaging.Color.getWhite());

// 通過指定具有紅黑色的 Pen 對象繪製虛線弧形
// 顏色和坐標、高度、寬度、開始和結束角度
int width = 200;
int height = 300;
int startAngle = 45;
int sweepAngle = 270;

// 繪製圓弧到屏幕
graphic.drawArc(new Pen(com.aspose.imaging.Color.getBlack(), 3), 0, 0, width, height, startAngle, sweepAngle);

// 保存所有更改
image.save("draw_arc.bmp");
以下是上述代碼示例的輸出。
使用 Java 繪製矩形
下面是在Java中繪製矩形的步驟。
- 首先,創建一個 BmpOptions 類的對象並使用 setBitsPerPixel() 方法設置每個像素的位數。
- 然後,使用 setSource() 方法分配 StreamSource。
- 創建一個新圖像並使用 BmpOptions 對象和圖像的高度和寬度對其進行初始化。
- 創建一個 Graphics 類的對象並用 Image 對像初始化它。
- 使用 Graphics.clear() 方法用一些顏色清除圖像表面。
- 使用 Graphics.drawRectangle(Pen, Rectangle) 方法繪製矩形。
- 使用 Image.save() 方法生成並保存圖像。
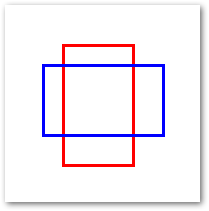
以下代碼示例顯示瞭如何使用 Java 在圖像上繪製矩形。
// 創建 BmpOptions
com.aspose.imaging.imageoptions.BmpOptions bmpCreateOptions = new com.aspose.imaging.imageoptions.BmpOptions();
bmpCreateOptions.setBitsPerPixel(32);

// 定義 BmpOptions 實例的源屬性
bmpCreateOptions.setSource(new StreamSource());

// 創建 Image 的實例並通過傳遞
// bmp 創建選項對象
com.aspose.imaging.Image image = com.aspose.imaging.Image.create(bmpCreateOptions, 400, 400);

// 創建並初始化 Graphics 類的實例
com.aspose.imaging.Graphics graphic = new com.aspose.imaging.Graphics(image);

// 用白色清除圖像表面
graphic.clear(com.aspose.imaging.Color.getWhite());

// 通過指定具有紅色的 Pen 對象繪製虛線矩形形狀
// 顏色和矩形結構
graphic.drawRectangle(new Pen(com.aspose.imaging.Color.getRed(), 3),
		new com.aspose.imaging.Rectangle(60, 40, 70, 120));

// 通過指定 Pen 對象繪製一個連續的矩形形狀
// solid brush with blue 顏色和矩形結構
graphic.drawRectangle(new Pen(new com.aspose.imaging.brushes.SolidBrush(com.aspose.imaging.Color.getBlue()), 3),
		new com.aspose.imaging.Rectangle(40, 60, 120, 70));

// 保存所有更改
image.save("draw_rectangle.bmp");
以下是上述代碼示例的輸出。
Java Image Drawing API - 獲得免費許可證
您可以 獲得免費的臨時許可證 並在不受評估限制的情況下繪製形狀。
結論
在本文中,您學習瞭如何使用 Java 繪製形狀。我們已經介紹瞭如何以編程方式在圖像上繪製直線、橢圓、弧和矩形。您可以輕鬆地將提供的代碼示例集成到您的 Java 應用程序中。
閱讀更多
您可以使用 文檔 探索有關 Java 圖像處理 API 的更多信息。此外,您可以通過我們的 論壇 與我們分享您的疑問。