MS PowerPoint 提供 3D 效果,使演示文稿更具吸引力。您可以使用 3D 文本、形状和图像来增强内容的交互性。在本文中,您将学习如何在 Python 中以编程方式应用 PowerPoint PPT 中的 3D 效果。我们将介绍如何在演示文稿中为文本、形状和图像创建 3D 效果。
- 在 PowerPoint 中创建 3D 效果的 Python 库
- 用 Python 在 PowerPoint 中创建 3D 文本
- 使用 Python 在 PowerPoint 中创建 3D 形状
- 为 3D 形状设置渐变
- 将 3D 效果应用于 PowerPoint 中的图像
在 PowerPoint 中应用 3D 效果的 Python 库
Aspose.Slides for Python via .NET 是一个功能丰富的 Python 库,旨在创建和操作 PowerPoint 演示文稿。我们将使用这个库在 PowerPoint PPT/PPTX 演示文稿中应用 3D 效果。使用以下命令从 PyPI 安装库。
> pip install aspose.slides
用 Python 在 PowerPoint 中创建 3D 文本
以下是使用 Python 在 PowerPoint PPT 中创建 3D 文本片段的步骤。
- 首先,创建一个新的 PPT 或使用 Presentation 类加载现有的。
- 然后,使用 addautoshape() 方法添加一个新的矩形形状。
- 设置形状的属性,例如填充类型、文本等。
- 将形状内的文本部分引用到对象中。
- 将格式应用于文本部分。
- 获取形状内文本框的参考。
- 使用 textframe.textframeformat.threedformat 中的属性应用 3D 效果。
- 最后,使用 Presentation.save(String, SaveFormat) 方法保存演示文稿。
以下代码示例展示了如何在 Python 中的 PowerPoint 中创建 3D 文本。
with slides.Presentation() as pres:
    # 添加形状
    shape = pres.slides[0].shapes.add_auto_shape(slides.ShapeType.RECTANGLE, 200, 150, 250, 250)
    shape.fill_format.fill_type = slides.FillType.NO_FILL
    shape.fill_format.fill_type = slides.FillType.NO_FILL
    shape.line_format.fill_format.fill_type = slides.FillType.NO_FILL
    shape.text_frame.text = "3D text"

    # 访问文本部分并应用格式
    portion = shape.text_frame.paragraphs[0].portions[0]
    portion.portion_format.fill_format.fill_type = slides.FillType.PATTERN
    portion.portion_format.fill_format.pattern_format.fore_color.color = drawing.Color.dark_orange
    portion.portion_format.fill_format.pattern_format.back_color.color = drawing.Color.white
    portion.portion_format.fill_format.pattern_format.pattern_style = slides.PatternStyle.LARGE_GRID

    shape.text_frame.paragraphs[0].paragraph_format.default_portion_format.font_height = 128

    # 访问文本框
    textFrame = shape.text_frame

    # 设置“Arch Up”艺术字变换效果
    textFrame.text_frame_format.transform = slides.TextShapeType.ARCH_UP

    # 应用 3D 效果
    textFrame.text_frame_format.three_dformat.extrusion_height = 3.5
    textFrame.text_frame_format.three_dformat.depth = 3
    textFrame.text_frame_format.three_dformat.material = slides.MaterialPresetType.PLASTIC
    textFrame.text_frame_format.three_dformat.light_rig.direction = slides.LightingDirection.TOP
    textFrame.text_frame_format.three_dformat.light_rig.light_type = slides.light_rigPresetType.BALANCED
    textFrame.text_frame_format.three_dformat.light_rig.set_rotation(0, 0, 40)

    textFrame.text_frame_format.three_dformat.camera.camera_type = slides.CameraPresetType.PERSPECTIVE_CONTRASTING_RIGHT_FACING

    # 另存为图像(可选)
    pres.slides[0].get_thumbnail(2, 2).save("3D-text.png")

    # 保存演示文稿
    pres.save("3D-text.pptx", slides.export.SaveFormat.PPTX)
以下屏幕截图显示了上述代码示例的输出。

使用 Python 在 PowerPoint 中创建 3D 形状
与文本类似,您可以将 3D 效果应用于 PowerPoint 演示文稿中的形状。以下是使用 Python 在 PowerPoint 中创建 3D 形状的步骤。
- 首先,使用 Presentation 类创建一个新的 PPT。
- 然后,使用 addautoshape() 方法添加一个新的矩形形状。
- 使用 shape.textframe.text 属性设置形状的文本。
- 使用 shape.threedformat 中的属性将 3D 效果应用于形状。
- 最后,使用 Presentation.save(String, SaveFormat) 方法保存演示文稿。
以下代码示例演示如何使用 Python 将 3D 效果应用于 PowerPoint 中的形状。
with slides.Presentation() as pres:
    # 添加形状
    shape = pres.slides[0].shapes.add_auto_shape(slides.ShapeType.RECTANGLE, 200, 150, 200, 200)
    shape.text_frame.text = "3D"
    shape.text_frame.paragraphs[0].paragraph_format.default_portion_format.font_height = 64

    # 应用 3D 效果
    shape.three_dformat.camera.camera_type = slides.CameraPresetType.ORTHOGRAPHIC_FRONT
    shape.three_dformat.camera.set_rotation(20, 30, 40)
    shape.three_dformat.light_rig.light_type = slides.LightRigPresetType.FLAT
    shape.three_dformat.light_rig.direction = slides.LightingDirection.TOP
    shape.three_dformat.material = slides.MaterialPresetType.FLAT
    shape.three_dformat.extrusion_height = 100
    shape.three_dformat.extrusion_color.color = drawing.Color.blue

    # 另存为图像(可选)
    pres.slides[0].get_thumbnail(2, 2).save("3D-shape.png")

    # 保存演示文稿
    pres.save("3D-shape.pptx", slides.export.SaveFormat.PPTX)
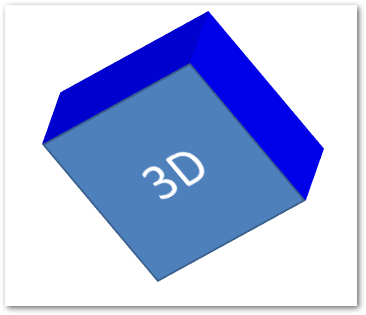
下面是我们执行这段代码后得到的 3D 形状。

为 3D 形状创建渐变
您还可以按照以下步骤将渐变效果应用于形状。
- 首先,使用 Presentation 类创建一个新的 PPT。
- 然后,使用 addautoshape() 方法添加一个新的矩形形状。
- 使用 shape.textframe.text 属性设置形状的文本。
- 将 shape.fillformat.filltype 设置为 FillType.GRADIENT 并设置渐变颜色。
- 使用 shape.threedformat 中的属性将 3D 效果应用于形状。
- 最后,使用 Presentation.save(String, SaveFormat) 方法保存演示文稿。
以下代码示例演示如何将渐变效果应用于 PowerPoint 中的形状。
with slides.Presentation() as pres:
    # 添加形状
    shape = pres.slides[0].shapes.add_auto_shape(slides.ShapeType.RECTANGLE, 200, 150, 250, 250)
    shape.text_frame.text = "3D"
    shape.text_frame.paragraphs[0].paragraph_format.default_portion_format.font_height = 64

    # 将填充类型设置为渐变
    shape.fill_format.fill_type = slides.FillType.GRADIENT
    shape.fill_format.gradient_format.gradient_stops.add(0, drawing.Color.blue)
    shape.fill_format.gradient_format.gradient_stops.add(100, drawing.Color.orange)

    # 应用 3D 效果
    shape.three_dformat.camera.camera_type = slides.CameraPresetType.ORTHOGRAPHIC_FRONT
    shape.three_dformat.camera.set_rotation(10, 20, 30)
    shape.three_dformat.light_rig.light_type = slides.LightRigPresetType.FLAT
    shape.three_dformat.light_rig.direction = slides.LightingDirection.TOP
    shape.three_dformat.extrusion_height = 150
    shape.three_dformat.extrusion_color.color = drawing.Color.dark_orange

    # 另存为图像(可选)
    pres.slides[0].get_thumbnail(2, 2).save("3D-shape-gradient.png")

    # 保存演示文稿
    pres.save("3D-shape-gradient.pptx", slides.export.SaveFormat.PPTX)
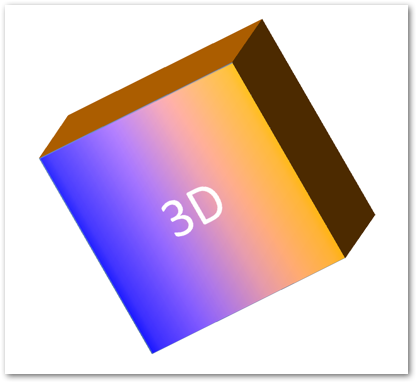
以下是应用渐变效果后的 3D 形状。

在 Python 中将 3D 效果应用于 PowerPoint 中的图像
您还可以对 PowerPoint 演示文稿中的图像应用 3D 效果。以下是在 Python 中执行此操作的步骤。
- 使用 Presentation 类创建一个新的 PPT。
- 然后,使用 addautoshape() 方法添加一个新的矩形形状。
- 将 shape.fillformat.filltype 设置为 FillType.PICTURE 并添加图像。
- 使用 shape.threedformat 中的属性将 3D 效果应用于形状。
- 使用 Presentation.save(String, SaveFormat) 方法保存演示文稿。
以下是使用 Python 对 PPT 中的图像应用 3D 效果的步骤。
with slides.Presentation() as pres:
    # 添加形状
    shape = pres.slides[0].shapes.add_auto_shape(slides.ShapeType.RECTANGLE, 200, 150, 250, 250)

    # 将填充类型设置为图片
    shape.fill_format.fill_type = slides.FillType.PICTURE

    # 从文件加载图像
    with open("tiger.bmp", "rb") as fs :
        data = fs.read()

        # 设置图像
        shape.fill_format.picture_fill_format.picture.image = pres.images.add_image(data)
        shape.fill_format.picture_fill_format.picture_fill_mode = slides.PictureFillMode.STRETCH

        # 对图像应用 3D 效果
        shape.three_dformat.camera.camera_type = slides.CameraPresetType.ORTHOGRAPHIC_FRONT
        shape.three_dformat.camera.set_rotation(10, 20, 30)
        shape.three_dformat.light_rig.light_type = slides.LightRigPresetType.FLAT
        shape.three_dformat.light_rig.direction = slides.LightingDirection.TOP
        shape.three_dformat.extrusion_height = 150
        shape.three_dformat.extrusion_color.color = drawing.Color.dark_orange

    # 另存为图像(可选)
    pres.slides[0].get_thumbnail(2, 2).save("image_3d.png")

    # 保存演示文稿
    pres.save("3D-image.pptx", slides.export.SaveFormat.PPTX)
以下是我们应用 3D 效果后得到的结果图像。

获得免费许可证
您可以通过 .NET 获得 免费临时许可证 以使用 Aspose.Slides for Python,而不受评估限制。
结论
在本文中,您学习了如何使用 Python 在 PowerPoint 演示文稿中应用 3D 效果。我们已经介绍了如何创建 3D 文本或形状并将 3D 效果应用于 PPT 或 PPTX 演示文稿中的图像。如果您想通过 .NET 探索更多关于 Aspose.Slides for Python 的信息,您可以访问 文档。此外,您可以将您的查询发布到我们的 论坛。